


To the right is the exposure graph. Most of the time the indicator is under the 0
mark, but if you have set Auto Exposure Compensation (AEC) the indicator will move
to the - or the + side to show how much compensation you are using. It has a +/- 2
stop range. This graph is also used to show Auto Exposure Bracketing (AEB). As you
set AEB you will see the single indicator become three indicators showing how much
AEB you have selected. You will also see a numeric indication of the AEB amount in
the upper right hand of the display. You can combine AEB with AEC, but you are still
limited to the 2 stop maximum range.
The graph also is used as a short count down indicator for the red eye reduction
lamp.
The exposure graph is also used when metering in manual mode. Setting the indica-
tor to 0 is what the camera’s meter recommends. Of course one of the prime reasons for
using manual mode is disregard what the meter says, but it still gives you an indication
of how far you are from the recommended exposure.
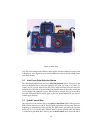
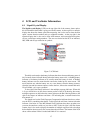
4.2 Viewfinder Display
The viewfinder also shows much of the same information as the LCD so that you can
see necessary data without removing your eye from the viewfinder. The screen is called
a New Laser Matte screen and it is fairly bright, but it is accused of sacrificing contrast
for brightness. This would be bad, if true, in a manual focus camera but isn’t much
to complain about with autofocus. You can see three autofocus squares that light up
as they come into focus, indicating which AF point is active. The actual AF area is
slightly larger than the small squares show but accurately indicate the spot. There is
also an AF indicator dot in the line of lights below the screen. These AF squares will
also light up when you manually focus your EF (EOS) mount lens. But if you are using
a manual focus lens with a lens adapter they will not work.
The central AF point is a cross type sensor and is sensitive to contrasting lines in
any direction. The outer AF points are linear and are sensitive to horizontal contrasting
lines. They won’t work if the only lines are completely vertical. In practice this isn’t
much of a issue and you can always tip the camera a bit for vertical lined subjects.
Also on the screen is a small square in the upper left. This is what you look at
to activate the DOF preview when using eye control on the Elan IIe. To use it you
have to have the camera in One Shot focus mode, lock the focus on something using
eye control to select the AF point, then look at the little square. The lens will then
stop down to the taking aperture and you will see the screen get darker and the depth
of field get deeper. Of course you have to have selected an aperture smaller than the
lenses maximum for this to do anything.
When you press the shutter button half way down the meter is activated and the
viewfinder data display is lit up. At the bottom of the view screen, starting on the left,
there is an eye control indicator. Next to it is the * of the Auto Exposure Lock (AEL)
indicator, followed by a flash ready indicator that is also used to indicate invalid Flash
Exposure Lock (FEL) warning. The numeric display is for the shutter speed, eye con-
trol calibration, and FEL lock indication. The next numeric display is for the aperture
value. Followed by the Flash Exposure Compensation (FEC) indicator. Then there is
the exposure graph like the one on the LCD and is used for the same purposes. The
18