


and hold the shutter button until the camera beeps. You’re all done, but you should
do this repeatedly in different kinds of lighting. The more you recalibrate, the more
accurate ECF will become.
There are three different calibration settings that can be used for different people
or for when you wear glasses, contacts, etc. You can change the calibration setting by
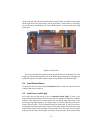
turning the Command Dial to CAL and then turning the Main Dial. You can see the
selection (1, 2 or 3) in both the viewfinder and the LCD on the top of the camera.
You can erase a calibration setting by selecting it and then holding the two small
thumb buttons on the upper right of the camera back, until the setting blinks in the LCD
screen on the top of the camera. You should always erase a calibration setting if it is
to be used by another photographer. Then recalibrate to their eye. Otherwise someone
else’s previous calibrations will continue to effect their new ones.
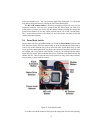
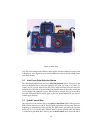
2.4 Metering Mode
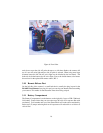
Just below, and on the same switch stem as the Command Dial is the Metering mode
switch. The front (blank square) position sets the camera to center weighted metering.
If you are very used to metering patterns of older manual cameras and automatically
correct for their metering errors in difficult situations, you might feel more comfortable
with this position. The middle position sets the camera to 9.5% partial area metering.
This is basically a fat spot meter. The area it meters is a bit larger than the bright
circular area surrounding the center AF point. By setting custom function #8 to "1",
the partial metering area will move to the area surrounding the active AF point if that
point is selected manually or by eye control, otherwise it stays in the center. The
rear position (square with circle in it) of the metering mode switch sets the camera to
evaluative metering mode. This divides the picture area up into several areas, meters
them independently and then compares that to a database of possible images that would
create such a pattern of light & dark areas. The camera’s computer then decides what
exposure to use. This mode works quite well and provides the highest percentage of
accurate exposures with the least amount of effort, but its down side is, you never
really know how much it is biasing the exposure towards the dark or light areas. If
you know what you’re doing, in difficult lighting, such as a backlit portrait or an arctic
fox in the snow, you would be better off using the partial meter and making your own
compensations. You’ll also learn more this way.
2.5 Self Timer / Remote Control
Just to the front and left of the Command Dial is the Self Timer button that also acti-
vates the IR remote switch. Press this button and the Self Timer indicator appears in
the LCD. If you press the shutter, you will have 10 seconds before the shutter fires.
This should give you time to get into the picture yourself. The red light on the front
of the camera will blink every second and speed up for the last two seconds before it
fires. The beeper will also sound during this time if you don’t have the beeper turned
off. With custom function #5 set to "1", the self timer is reduced to a 2 second delay
with the mirror raising as soon as you press the shutter. This is used primarily to re-
duce camera vibrations caused by the mirror movement. Its main purpose is in extreme
8