


Location and Function of Parts
11
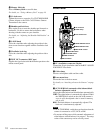
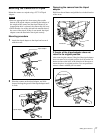
e MENU SELECT knob
When the DISPLAY switch on the side panel is set to
MENU and the menu is displayed, turn this control knob
to select a menu item and press it to register the selection.
For details, see “Menu Operation” on page 21.
f MIC LEVEL (microphone level) control
When a portable VTR is connected using the CCZ cable of
the CA-570/570P Camera Adaptor, the microphone level
can be adjusted by turning this control.
When the CA-570/570P Camera Adaptor is used and the
LEVEL/MIC switch on the rear panel of the camera
adaptor is set to FRONT/OFF, the sound volume of the
intercom can be adjusted using this control.
g SHUTTER switch
OFF: An electronic shutter does not function.
ON: An electronic shutter is activated.
SEL: The shutter speed and shutter mode change each
time the switch is set to this position.
When you set the shutter mode to SLS, the camera
enters Slow-Shutter mode (Accumulation mode). You
can select the accumulation time in the range of 1 to 7
frames using the PAINT Menu.
• In Slow-Shutter mode, the following restrictions are
generated:
Iris: When a remote control unit is connected, AUTO
IRIS mode is set to OFF. When no remote control
unit is connected and the camera is used in AUTO
IRIS mode, the iris is forcibly opened. If you wish to
adjust the iris, set AUTO IRIS to OFF using the
MAINTENANCE Menu and adjust it manually.
Flare compensation: The FLARE setting on the SW
STATUS (P1) page selected from the PAINT Menu is
forcibly set to OFF.
Auto white balance: The time required for automatic
white balance adjustment may be prolonged
depending on the setting of accumulation time.
• The following phenomena are due to the characteristics
of a CCD in Slow-Shutter mode and are not defects of
the product. For details, consult your Sony service
personnel:
– White dots on the CCD become clear when you
increase the number of frames for Slow-Shutter mode.
– The picture is distorted when the camera is switched to
Slow-Shutter mode.
• The SHUTTER switch does not function when the
camera is connected to a CCU, RCP, or RM.
h VTR START button
When a Camera Control Unit (CCU) is connected, the
audio signal of the intercom is sent to the CCU while this
button is held pressed.
When a VTR is connected using the CCZ cable of the
CA-570/570P, pressing this button starts recording, and
pressing it again stops recording. It is the same function as
with the VTR button on the lens.
i LENS connector (12-pin)
Connect a lens cable.
j MIC (microphone) connector (3-pin)
Connect a microphone cable.
Normally, connect the microphone supplied with the BVF-
10/10CE/20W/20WCE Viewfinder.
Phantom powering is turned off with the appropriate
internal switch setting.
For setting the switch, consult your Sony service
personnel.
Notes