


Editing Монтаж
93
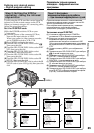
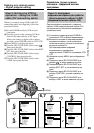
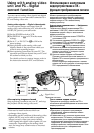
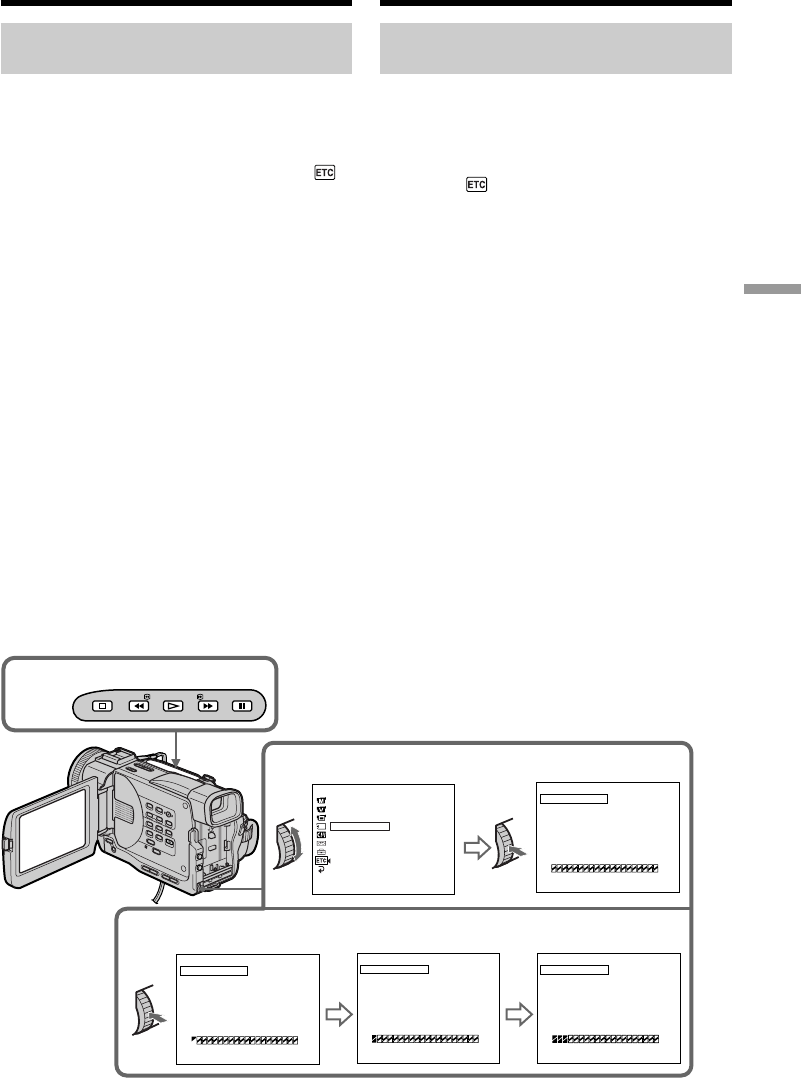
Operation 1: Making the
Programme
(1)Insert the tape for playback into your
camcorder, and insert a tape for recording
into the VCR.
(2)Press MENU to display the menu.
(3)Turn the SEL/PUSH EXEC dial to select ,
then press the dial.
(4)Turn the SEL/PUSH EXEC dial to select
VIDEO EDIT, then press the dial.
(5)Search for the beginning of the first scene you
want to insert using the video operation
buttons, then pause playback (p. 39).
(6)Press MARK on the Remote Commander
(DCR-TRV11E/TRV20E only), or the SEL/
PUSH EXEC dial.
The IN point of the first programme is set,
and the top part of the programme mark
changes to light blue.
(7)Search for the end of the first scene you want
to insert using the video operation buttons,
then pause playback.
(8)Press MARK on the Remote Commander
(DCR-TRV11E/TRV20E only), or the SEL/
PUSH EXEC dial.
The OUT point of the first programme is set,
then the bottom part of the programme mark
changes to light blue.
(9)Repeat steps 5 to 8, then set PROGRAM.
When the programme is set, the programme
mark changes to light blue.
You can set maximum of 20 programmes.
Dubbing only desired scenes
– Digital program editing
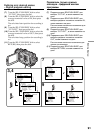
6,8,9
5,7
4
BEEP
CO
MM
ANDER
D
I
SPL
AY
V
I
DEO ED
I
T
ED
I
TSET
[
MENU
]
:
END
READY
OTHERS
MARK
UNDO
ERASE ALL
START
0:32:30:14
1I N
TOTAL
SCENE
0:00:00:00
0
V
I
DEO ED
I
T
MARK
UNDO
ERASE ALL
START
0:08:55:06
1 OUT
TOTAL
SCENE
0:00:00:00
0
V
I
DEO ED
I
T
[
MENU
]
:
END
[
MENU
]
:
END
MARK
UNDO
ERASE ALL
START
0:09:07:06
2I N
TOTAL
SCENE
0:00:12:13
1
V
I
DEO ED
I
T
MARK
UNDO
ERASE ALL
START
0:10:01:23
4I N
TOTAL
SCENE
0:00:47:12
3
V
I
DEO ED
I
T
[
MENU
]
:
END
[
MENU
]
:
END
STOP
PLAY
PAUSE
REW
FF
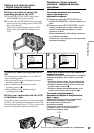
Дeйcтвиe 1: Cоcтaвлeниe
пpогpaммы
(1) Bcтaвьтe кacceтy, c котоpой Bы xотитe
пpоизвecти зaпиcь, в видeокaмepy, a
кacceтy для зaпиcи - в видeомaгнитофон.
(2) Haжмитe кнопкy MENU для отобpaжeния
мeню.
(3) Повepнитe диcк SEL/PUSH EXEC для
выбоpa , a зaтeм нaжмитe нa диcк.
(4) Повepнитe диcк SEL/PUSH EXEC для выбоpa
VIDEO EDIT, a зaтeм нaжмитe нa диcк.
(5) C помощью кнопок yпpaвлeния видeо
нaйдитe нaчaло пepвого эпизодa, котоpый
Bы xотитe вcтaвить, и включитe peжим
пayзы воcпpоизвeдeния (cтp. 39).
(6) Haжмитe кнопкy MARK нa пyльтe
диcтaнционного yпpaвлeния (только для
модeли DCR-TRV11E/TRV20E), или нa
диcк SEL/PUSH EXEC.
Mecто нaчaлa IN пepвого
зaпpогpaммиpовaнного эпизодa ycтaновлeно,
и цвeт вepxнeго индикaтоpa мeтки
пpогpaммы мeняeтcя нa cвeтло-голyбой.
(7) C помощью кнопок yпpaвлeния видeо
нaйдитe конeц пepвого эпизодa, котоpый
Bы xотитe вcтaвить, и включитe peжим
пayзы воcпpоизвeдeния.
(8) Haжмитe кнопкy MARK нa пyльтe
диcтaнционного yпpaвлeния (только для
модeли DCR-TRV11E/TRV20E), или нa
диcк SEL/PUSH EXEC.
Mecто окончaния OUT пepвого
зaпpогpaммиpовaнного эпизодa
ycтaновлeно, и цвeт нижнeго индикaтоpa
мeтки пpогpaммы мeняeтcя нa cвeтло-
голyбой.
(9) Повтоpяйтe пyнкты c 5 по 8, зaтeм
ycтaновитe peжим PROGRAM.
Поcлe зaвepшeния пpогpaммиpовaния
цвeт индикaтоpa мeтки мeняeтcя нa
cвeтло-голyбой.
Bы можeтe ycтaновить мaкcимyм 20
пpогpaмм.
Пepeзaпиcь только нyжныx
эпизодов
– Цифpовой монтaж
пpогpaммы