


120
Maintenance
Chapter 7 Appendix
Maintenance
Cleaning the video heads
Always use the special-purpose Sony DVM-12CLD
Cleaning Cassette for cleaning the audio and video heads.
Follow the instructions with the cleaning cassette
carefully, as inappropriate use of the cleaning cassette can
damage the heads.
When the DVM-12CLD is inserted in the camcorder, only
STOP, PLAY, REW and EJECT buttons function.
Replacing the video heads
If cleaning the video heads fails to restore picture quality,
the heads may be due for replacement.
Keep a check of the hours of head drum operation: with
normal use, the heads should need replacing after about
2,000 hours of use.
When the heads need replacement, contact your Sony
dealer.
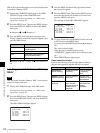
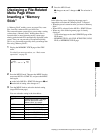
Check the hours of head drum operation in the DRUM
RUNNING item on the HOURS METER page of the
DIAGNOSIS menu.
Replacing other parts
For replacement of all parts other than the video heads,
contact your Sony dealer.
Using the auto-check function
An internal check can be performed automatically using
the auto-check function of the camcorder. Meanwhile, a
one minute test recording and playback are also
performed. Before shooting, it is desirable to perform this
auto-check to check for problems in the VTR’s internal
operations based on the results of the internal check
displayed on the LCD monitor and on the quality of the
video and audio recordings.
Preparations for testing
Make preparations as shown below.
• Connect a monitor to the MONITOR OUT connector
(page 16)
• Connect an earphone or headphones to the EARPHONE
connector
(page 13)
• Prepare a cassette for test recording (page 47)
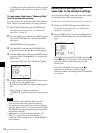
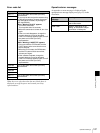
To perform the auto-check
1
Display the DEV STATUS 2 page of the DIAGNOSIS
menu.
For details on menu operations, see “Basic menu
operations” on page 93.
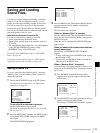
2
Press the MENU knob. Then turn the MENU knob to
move b to AUTO CHECK, and press the MENU knob
again.
The message “EXECUTE OK? YES b NO” appears.
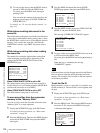
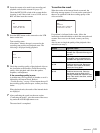
3
Turn the MENU knob to move b to YES, and press the
MENU knob.
The message “AUTO CHECK EXECUTING”
appears on the viewfinder, and then the LCD monitor
changes to the AUTO CHECK display. Follow the
instructions that appear on the LCD monitor.
Note
?D04 DEV STATUS2 TOP
AUTO CHECK : EXEC
HUMID TIMER RESET: EXEC
D04 DEV STATUS2 TOP
EXECUTE OK? YES NO
AUTO CHECK : EXEC
HUMID TIMER RESET: EXEC
<AUTO CHECK>
EJECT
PLEASE EJECT CASSETTE
(PUSH EJECT BUTTON)
If there is a cassette in
the camcorder, follow
the instructions and
eject the cassette.
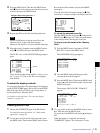
<AUTO CHECK>
LOAD
INJECT REC TAPE