


9
Location and Function of Parts
Chapter 1 Overview
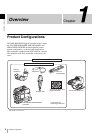
Location and Function of Parts
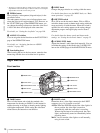
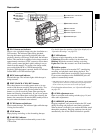
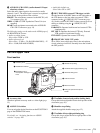
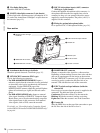
Front view
a Lens mount cap
Remove by pushing up the lens locking lever (page 10).
When no lens is mounted, keep this cap fitted for
protection from dust.
b LENS connector (12-pin)
Connect the lens cable. Contact your Sony representative
for more information about the lens you can use.
c REC (recording start) button
Press to start recording. Press it again to stop recording.
The effect is exactly the same as that of the VTR button on
the lens. When the REC SWITCH function is assigned to
the ASSIGN switch on the FUNCTION 1 page of the
OPERATION menu, you can use the switch as the REC
button.
You can select the recording format for the video signal
from either DVCAM mode or DV-SP mode on the VTR
MODE page of the MAINTENANCE menu.
In the recording pause state, the camcorder waits for a
certain period of time in the standby-on mode and then
automatically switches to standby-off mode. This length of
the standby-on period with no operation can be set to
either 1 minute, 3 minutes, or 5 minutes on the VTR MODE
page of the MAINTENANCE menu.
d AUTO W/B BAL (automatic white/black balance
adjustment) switch
Activates the white/black balance automatic adjustment
functions.
WHT: Adjusts the white balance automatically. If the
WHITE BAL switch
(page 11) is set to A or B, the
white balance setting is stored in the corresponding
memory.
BLK: Adjusts the black set and black balance
automatically.
e VF (viewfinder) connector (20-pin)
Connect the supplied DXF-801 Viewfinder.
f Lens mount (special bayonet mount)
Attach the lens.
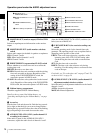
g FILTER selector
Selects the most appropriate filter to match the light source
illuminating the subject. When this selector is used with
the display mode set to 3
(page 99), the new setting
appears on the viewfinder screen for about 3 seconds.
FILTER selector setting and examples of shooting
conditions
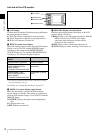
3 REC button
1 Lens mount cap
4 AUTO W/B BAL switch
6 Lens mount
7 FILTER selector
2 LENS connector
5 VF connector
8 ZEBRA button
9 ASSIGN 1/2 switches
0 Lens locking lever
qa MENU knob
qs SHUTTER switch
qd AUDIO LEVEL knob
FILTER selector setting Examples of shooting
conditions
1 (CLEAR) Studio halogen lighting
(incandescent)
2 (1/4 ND) Cloudy or rainy outdoor shooting,
or to reduce the depth of field*
3 (1/16 ND) Sunlight
4 (1/64 ND) To reduce the depth of field in
sunlight