


129
Troubleshooting
Chapter 7 Appendix
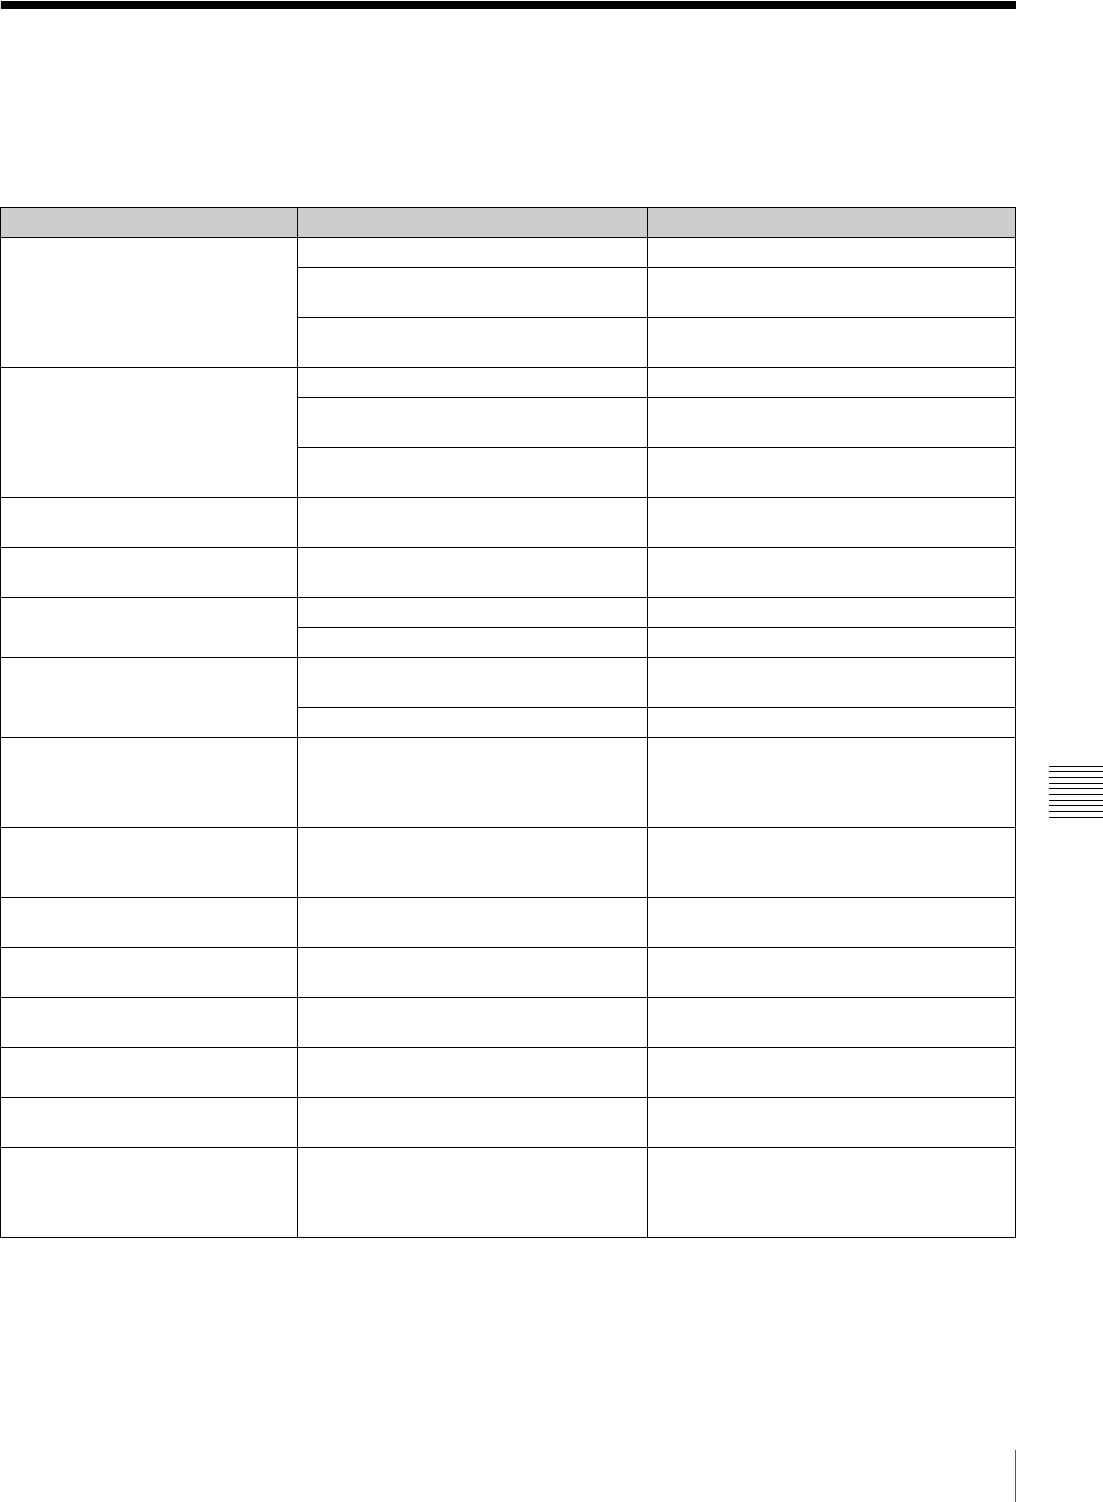
Troubleshooting
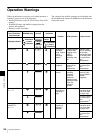
You can use this chart to establish possible causes of an
apparent problem; always double-check before sending
the camcorder for repair. If a problem persists, contact
your Sony dealer.
When the indication “Er00-***” appears in the LCD
monitor, see
“Error code list” on page 128.
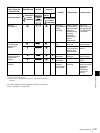
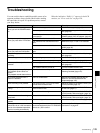
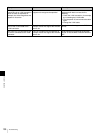
Symptoms Cause Remedy
The camcorder does not power on
when you turn the POWER switch
on.
There is no battery pack loaded. Attach a battery pack (page 30).
The battery pack is exhausted. Replace the battery pack with a fully charged
one
(page 30).
The AC adaptor is not connected, or it is
not turned on.
Connect the AC adaptor, or turn on the
POWER switch of the AC adaptor (page 30).
The tape transport does not operate
when you press either VTR button.
The POWER switch is turned off. Set the POWER switch to ON.
The camcorder has reached the end of
tape.
Rewind the tape, or load a new cassette.
The cassette is set record-inhibited. Load a new cassette, or release the record-
inhibit
(page 49).
The tape transport does not operate
when you press the PLAY button.
The camcorder has reached the end of
tape.
Rewind the tape, or load a new cassette.
The power supply cuts while
operating.
The battery pack is exhausted. Replace the battery pack with a fully charged
one
(page 30).
The battery goes dead very quickly. The operating temperature is very low. Use a BP-GL95 (page 30).
The battery pack is inadequately charged. Recharge the battery pack (page 30).
It is not possible to eject the
cassette.
The battery pack is exhausted. Replace the battery pack with a fully charged
one
(page 30).
The POWER switch is turned off. Turn the POWER switch to ON.
The playback picture quality is poor.
The playback picture does not
appear.
The playback sound does not hear.
The video heads are dirty. Clean the video heads using a DVM-12CLD
Cleaning Cassette (page 121).
All controls except the EJECT
button are disabled.
There is condensation. Remove the cassette and wait with the
power on until the condensation has
evaporated
(page 120).
Audio recording is not possible. The AUDIO LEVEL (CH-1/CH-2) knobs
are set to the minimum level.
Adjust the setting of the AUDIO LEVEL (CH-
1/CH-2) controls
(page 15).
Audio recording is not possible (CH-
1 only).
The AUDIO LEVEL knob on the front is set
to the minimum level.
Adjust the setting of the AUDIO LEVEL knob
on the front
(page 11).
The recorded sound is distorted. The audio level is too high. Adjust the setting of the AUDIO LEVEL (CH-
1/CH-2) knobs, and record again
(page 15).
The recorded sound has a high
noise level.
The audio level is too low. Adjust the setting of the AUDIO LEVEL (CH-
1/CH-2) knobs, and record again
(page 15).
The cassette is automatically
ejected.
An incorrect type of cassette is inserted. Insert a correct type of cassette (page 48).
The equipment connected to the
camcorder via an i.LINK connection
carries out unintended operations,
such as recording automatically.
The settings of the camcorder and the
connected equipment (the VTR TRIGGER
switch, etc.) are incorrect.
Set correctly. See “Using an i.LINK
Connection” on page 42.