


15
EN
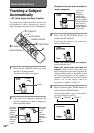
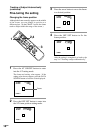
To keep the brightness of the subject
as is (Auto back lighting function)
After the step 2, press the AE button.
To disactivate the function, press that button
again.
Note
Be sure to press the AE button before proceeding with the
step 3. This function is not activated after the START/
STOP button is pressed.
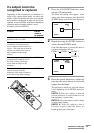
To keep the size of the memorized
subject as is
After the step 2, press the AUTO ZOOM button.
To cancel the function, press that button again.
To cancel the AT function
Press the START/STOP button.
The information of the memorized subject is
erased.
To exit from the AT setting mode, press the
AT ON/OFF button.
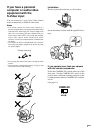
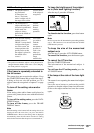
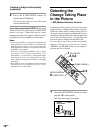
If the lamp at the side of the lens light
up
The camera is not capturing the memorized subject
correctly.
Press the arrow button to perform the pan/tilt
operation so that the subject comes into the screen.
Or have the subject memorized onto the camera
again.
continue to next page
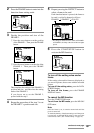
MODE
CHASE 1
CHASE 2
CHASE 3
Tracking method
The pan/tilt action is
not performed.
(Camera does not
move.) The frame
tracks a subject only in
the range of the screen.
The frame tracks a
subject while the pan/
tilt action is performed.
In this mode, the
subject is always
placed in the middle of
the screen.*
Uses the same tracking
method as that of
CHASE 1 except that if
a subject almost goes
out of the screen, the
camera performs the
pan/tilt action so that
the subject is placed in
the middle of the
screen.*
Intended use
Used to check
if the subject is
recognized.
Used to
perform
normal
tracking
operation.
Used when
you wish to
limit the
camera
movement as
possible, in
such a case
when you
perform the
image
transmission.
* The position in which the subject is to be placed can be
changed from the middle of the screen. See “Changing
the frame position” on page 16.
If the frame is repeatedly extended to
the full screen
The camera does not recognize the subject. Press
the START/STOP button and go back to the step 2.
If doing so does not solve the problem, see “If a
subject cannot be recognized or captured” on page
17.
To turn off the setting value and/or
frame
If the setting value and/or frame are displayed as
you record a picture, those come with the recorded
picture.
To turn off the setting value, press the DATA
SCREEN button.
To turn off the frame, press the FRAME
DISPLAY button.
Note
Once the setting value is turned off, the setting value is not
displayed until the next time you press the DATA
SCREEN button. However, the setting value is displayed
automatically when the unit enters into the AT setting
mode for the first time after the power is turned back on.
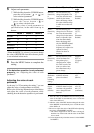
CHASE 1
AT AE
AT MODE P
-
T DRIVE
ENTRY1
51
SETTING
Lights up.