


176
GB
Table of
contents
Sample photo Menu Index
Connecting the camera to the
computer
“PlayMemories Home” allows you to easily import images.
For details on “PlayMemories Home” functions, see the “PlayMemories Home Help
Guide.”
Importing images to the computer without using “PlayMemories
Home”
When the AutoPlay Wizard appears after making a USB connection between the camera
and a computer, click [Open folder to view files] t [OK] t [DCIM] or [MP_ROOT]
t copy the desired images to the computer.
• For operations such as importing AVCHD movies to the computer, use “PlayMemories Home.”
• When the camera is connected to the computer, if you operate AVCHD movies or folders from the
connected computer, images may be damaged or cannot be played. Do not delete or copy AVCHD
movies on the memory card from the computer. Sony is not held liable for consequences resulting from
such operations via the computer.
1 Connect the camera to your Mac computer first. Double-click the newly
recognized icon on the desktop t the folder where the images you want
to import are stored.
2 Drag and drop the image files to the hard disk icon.
The image files are copied to the hard disk.
3 Double-click the hard disk icon t the desired image file in the folder
containing the copied files.
The image is displayed.
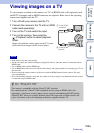
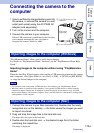
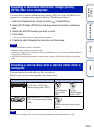
1 Insert a sufficiently charged battery pack into
the camera, or connect the camera to a wall
outlet (wall socket) using the AC-PW20 AC
Adaptor (sold separately).
2 Turn on the camera and the computer.
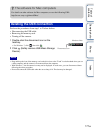
3 Connect the camera to your computer.
When a USB connection is established for the first time,
your computer automatically runs a program to
recognize the camera. Wait for a while.
Importing images to the computer (Windows)
Notes
Importing images to the computer (Mac)
1 To a USB terminal of the
computer
2 To the USB terminal
USB cable
(supplied)
Continued r