


89
Editing
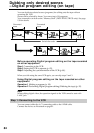
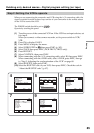
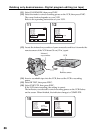
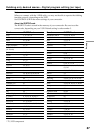
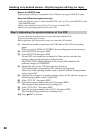
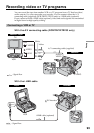
Dubbing only desired scenes – Digital program editing (on tape)
23
6
8
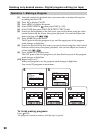
VIDEO EDI T
ED I T SET
CONTROL
ADJ TEST
”CUT
-
I
N”
”CUT
-OUT”
I
R SETUP
PAUSEMODE
I
R TEST
RET.
EXEC
RETURN
EXECUTE
ENGAGE
REC PAUSE
END
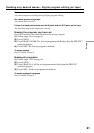
VIDEO EDI T
ED I T SET
CONTROL
ADJ TEST
”CUT
-
I
N”
”CUT
-OUT”
I
R SETUP
PAUSEMODE
I
R TEST
RET.
EXEC
0
VIDEO EDI T
ED I T SET
CONTROL
ADJ TEST
”CUT
-
I
N”
”CUT
-OUT”
I
R SETUP
PAUSEMODE
I
R TEST
RET.
EXEC
0
END
END
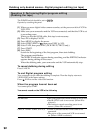
VIDEO EDI T
ED I T SET
CONTROL
ADJ TEST
”CUT
-
I
N”
”CUT
-OUT”
I
R SETUP
PAUSEMODE
I
R TEST
RET.
EXEC
COMPLETE
END
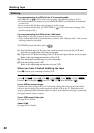
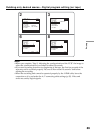
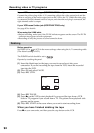
Notes
•When you complete “Step 3: Adjusting the synchronization of the VCR,” the image to
adjust the synchronization is recorded for about 50 seconds.
•If you start recording from the very beginning of the tape, the first few seconds of the
tape may not be recorded properly. Be sure to allow about 10 seconds’ lead before
starting the recording.
•When the recording unit cannot be operated properly by the i.LINK cable, leave the
connection as it is, and make the A/V connecting cable settings (p. 85). Video and
audio are sent by digital signals.