


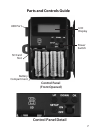


11
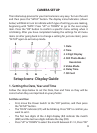
CAMERA SETUP (continued)
If you select the “Photo” mode icon (#4) then press “OK”:
The LCD will blink the alternating indicators “1P” (single photo taken •
per trigger event) and “3P” (sequence of 3 photos taken per trigger
event). Press “UP” or “DOWN” to select the setting you prefer, then
press “OK” to conrm.
Next, the LCD will display “LoHI” which sets the resolution for the still •
photos. “Lo” represents 3.0MP (the resolution of the sensor) and “HI”
represents is 5.0MP (via software interpolation-the photo quality
will be higher, but each le will use up more space on the SD card).
Press “UP” or “DOWN” to select the resolution you prefer and press
“OK” to conrm.
If you select the “Video” mode icon (#5) then press “OK”:
The movie length is preset at 15 seconds and cannot be changed. •
There are no additional settings or options for Video Mode.
After pressing “OK” (when you nish selecting the settings for one/three
photos and resolution if you chose “Photo” Mode), the “Delay Time” icon
(#6) will blink next.
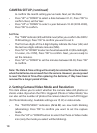
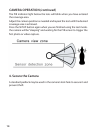
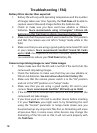
3. Setting the Delay Time
The Delay Time menu item allows you to set the interval that the camera
will sleep before accepting a new PIR trigger, in minutes and seconds.
This setting ranges from 1 second to 10 minutes. The default delay time
is 10 S.
While the Delay Time icon (• #6) is blinking, press “OK” to conrm you
want to set it.
The LCD will display “0010”, with rst the two digits indicating •
minutes and the last two digits indicating seconds.
While the rst two digits are blinking, press “UP” or “DOWN” to •
change the minutes value (Range from 00-60 min.). Press “OK” to
conrm the minutes setting.