


9
CAMERA SETUP
The initial setup process for your trail camera is very easy. Turn on the unit
and then press the “SETUP” button. The display icons/indicators (shown
below) will blink in turn to indicate which type of setting you are making,
beginning with “DATE”. Press “UP” or “DOWN” to go to the next setup
item. Press the “OK” button to conrm a specic menu setting when it
is blinking. After you have completed making the settings for all menu
items (or after going back in to change a setting for just one item), press
“SETUP” again to exit setup mode.
1. Setting the Date, Year and Time
Follow the steps below to set the Date, Year and Time so they will be
correct when they are imprinted on your photos:
Set Date and Year
First, move the Power Switch to the “ON” position, and then press •
the “SETUP” button.
The “DATE” indicator (• #1) will be blinking. Press “OK” to conrm you
want to set it.
The rst two digits of the 4 digit display (• #3) indicate the month
(MM) and the last two digits indicate the day (DD).
Press “UP” or “DOWN” to select the month between 01-12, Press “OK” •
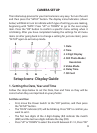
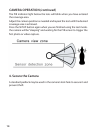
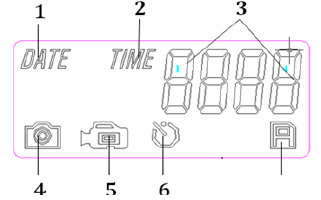
Setup Icons- Display Guide
1. Date
2. Time
3. 4 Digit Display
4. Still Photo Mode /
Resolution
5. Video Mode
6. Delay Time
7. SD Card
7