


12
CAMERA SETUP (continued)
(Only) if you selected “00” for the minutes setting, the last two digits
will blink ,and you can set a delay time in seconds (this is not available
if you selected from “01” to “60” minutes).
Press “UP” or “DOWN” to change the value (Range from 05-59 •
seconds), press “OK” to conrm.
Next (last item in the Setup menu), you will see the SD card icon (#7) blink.
You can now check the number of les on your SD card, and format it if
desired.
4. Checking the # of Stored Photo/Video Files
While the SD Card icon (• #7) is blinking, the total number of les
stored on the SD card will be seen on the 4 digit Display (#3). This
allows you to conrm if this is a new card or one you have used
previously (and may wish to format).
Press OK-this will take you to the “Format Card” menu item next. •
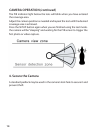
5. Formatting the SD Card
With the SD Card icon (#7) blinking (after pressing OK at the end of •
the previous Setup step), press “UP” or “DOWN” to select “FO” (Yes,
Format) or “NO” (Do Not Format) then press “OK” to conrm your
choice.
Press “UP” or “DOWN” to select “Y” (Yes) or “N” (No), then press “OK” to •
conrm. This step provides an extra level of safety, to help prevent
you from accidently formatting a card with les you wanted to keep.
If you select “FO” in the rst step, then select “Y” and press “OK”,
the camera will format the SD card-all les on the card will be
erased.
Exiting the Setup Menu
Once you have nished using the Setup menu, press “SETUP” to save all
your settings, and exit the Setup menu. You are now ready to take your
Trail Cam outside and begin using it to record wildlife activity.