


Assembling the Units Operator’s Manual LDK 100 Camera Head 2-5
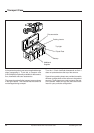
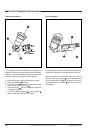
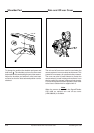
Positioning the 1.5-inch viewfinder
The horizontal position of the viewfinder can be adjusted
as follows to suit your requirements:
a. Loosen the locking ring
1
. (As seen from the rear
of the camera, turning the locking ring
counterclockwise moves it towards the handle.)
b. Slide the viewfinder horizontally along the rail to
the desired position.
c. Tighten the locking ring
1
by turning clockwise.
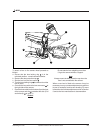
The dioptre hood and eyepiece of the viewfinder can be
rotated vertically.
The viewfinder can be positioned backwards and
forwards along the camera axis. Loosen the support
bracket round bar retaining lever
2
and slide the round
bar
3
forwards or backwards. When the desired position
is reached tighten the support bracket round bar
retaining lever
2
again.
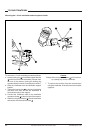
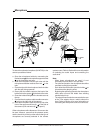
To use the viewfinder at a distance press the button
4
below or above the eyepiece tube and swing it free of
the associated clip
5
. The display can now be seen
from further away.
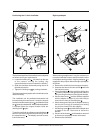
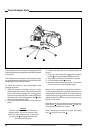
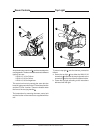
When wearing headphones it may be necessary to
move the viewfinder further to the left to obtain a more
comfortable viewing position. A right eye adapter
6
i s
supplied for this purpose. Mount the right eye adapter
as follows:
a. Remove the viewfinder from the support bracket.
b. Unscrew and remove the two screws
7
that hold
the bracket in place.
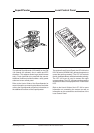
c. Attach the adapter
6
to the end of the sliding tube
8
so that it protrudes to the right (as seen from the
front) ensuring that the pins fit snugly into the slots.
d. Use the short screw
9
and the washers supplied
with the adapter to secure it to the left hole (as
seen from the front) of the sliding bar
8
.
e. Attach the support bracket to the adapter ensuring
that the pins fit snugly (if necessary turn locking
ring to move it away from the adapter).
f. Use the long screw
10
supplied with the adapter and
a washer in the left screw hole to secure the
bracket.
g. Use one of the screws
7
and the washer removed
at the start to completely secure the bracket.
h. Remount the viewfinder.
Right eye adapter
1
2
3
4
5
6
7
8
9
10