


Assembling the Units Operator’s Manual LDK 100 Camera Head 2-7
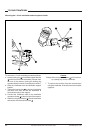
Microphone
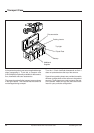
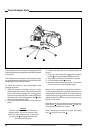
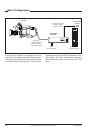
To attach the optional microphone (AJ MC700) to the
camera proceed as follows:
a. Open the microphone holder by unscrewing the
knurled screw
1
of the microphone support bracket
2
on the viewfinder and open.
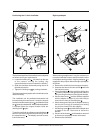
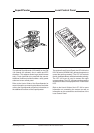
b. Slide the microphone into the split tube until the
microphone shoulder reaches the mark
5
in the
tube.
c. Place the tube with the microphone into the holder
with the split facing upwards.
d. Ensure that the rubber support at the back of the
holder fits into the groove
6
at the back of the tube.
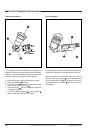
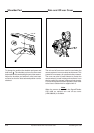
e. Close the holder and tighten the knurled screw at
the top.
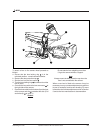
f. Connect the microphone cable to audio connector
3
(mic) on the right side of the camera.
g. Place the microphone cable into the top clip at the
front of the camera and into clip
4
at the side of
the camera.(Pull and twist clip
4
to open it.)
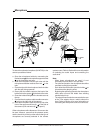
Other microphones with a diameter of 21mm can also
be used, however, ensure that the phantom power
and the sensitivity of the input that match that type of
microphone are correctly selected in the camera
systems menu. Refer to Section 6 for more information
on selecting the audio inputs and controlling the
audio level.
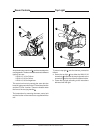
Note:
· When longer microphones are used, it is not
necessary to place them in the split tube.
· For optimum operation, the microphone should be
mounted as straight as possible.
· Don’t allow the wind hood to touch the holder
7
as
this reduces the damping effect.
· By placing the split facing upwards, the microphone
cable does not touch the holder thus avoiding
mechanical pick-up.
- The microphone can also be connected to the rear
of the Triax adapter where a switch selects the
input. Refer to Section 4 for more information on
connecting the microphone to the rear connector.
1
2
3
4
5
6
7