6 © Titan Tool Inc. All rights reserved.
Setup
Read, understand, and follow all warnings before
starting or operating this sprayer.
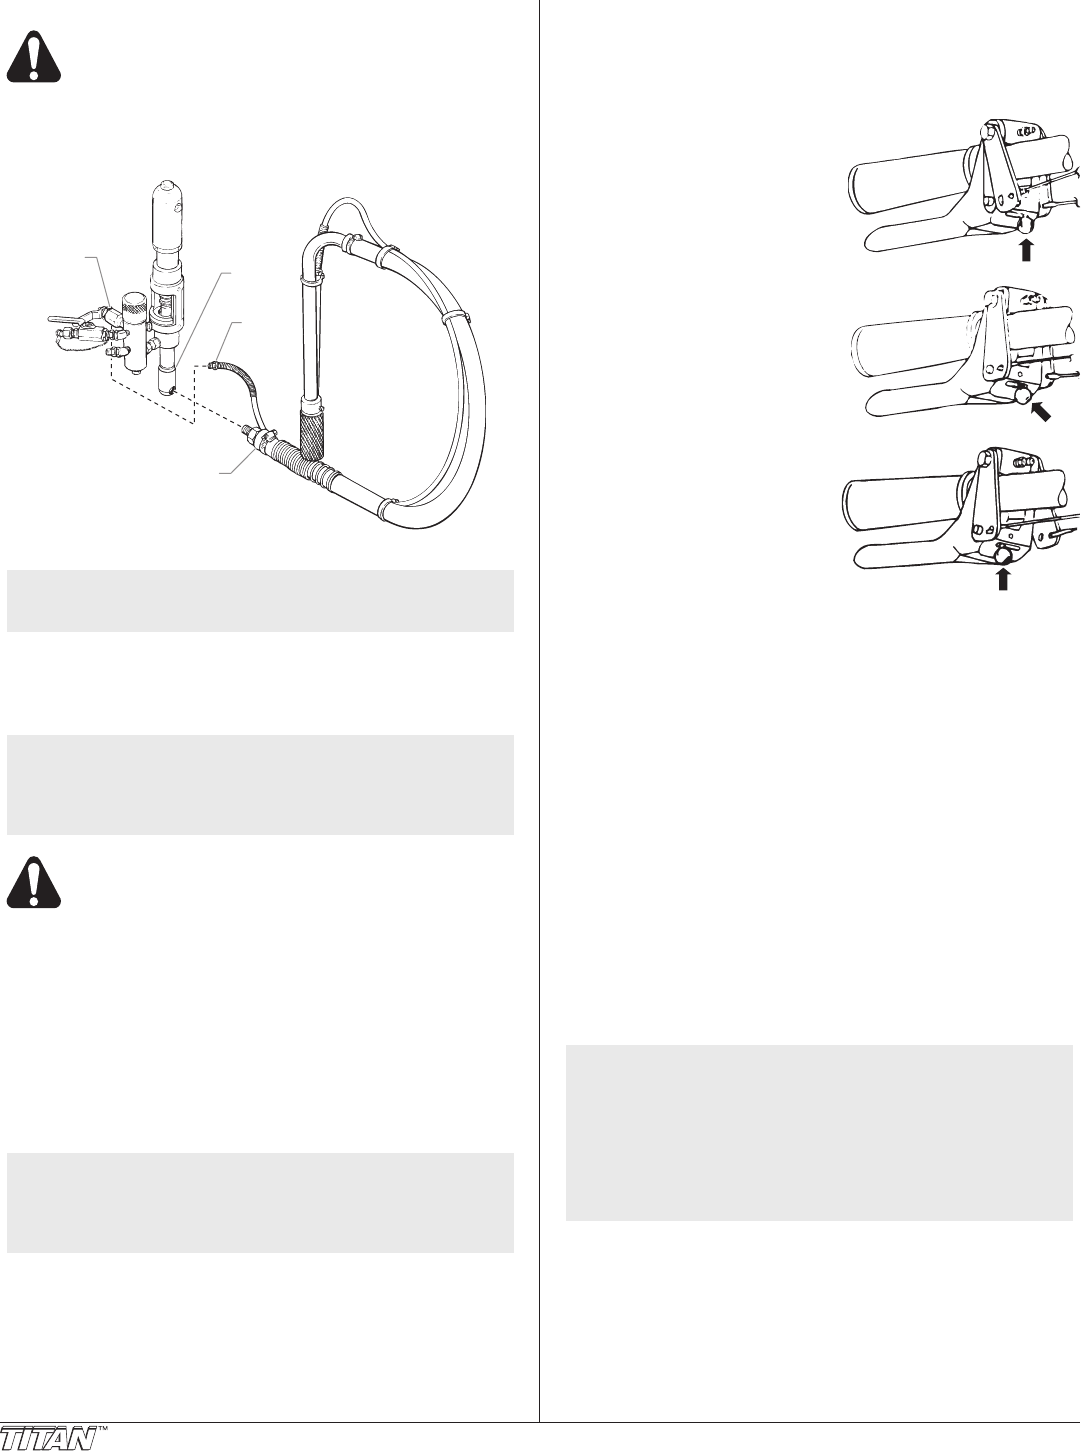
1. Make sure the siphon hose is connected to the uid
section and the bleed hose is connected to the bleed
valve. They each have factory installed 37)( tape on the
male end of the hoses and should be wrench tight.
Bleed
Hose
Fluid
Section
Siphon Hose
Bleed
Valve
2. Install the gun support bar.
NOTE: The spray gun, hose, and cables are mounted to
the gun support bar at the factory.
a. Loosen the support bar clamps on each side of the cart.
b. Slide the gun support bar through the cart.
c. Tighten the support bar clamps to secure the gun
support bar in position.
NOTE: The gun support bar and the spray gun(s) can be
mounted on either side of the sprayer. Refer to
the “Spray Gun Positions” illustration near the
back of this manual.
Always follow the Pressure Relief Procedure when
shutting the sprayer down for any purpose,
including servicing or adjusting any part of the
spray system, changing or cleaning spray tips, or
preparing for cleanup.
3. Position the rst spray gun.
a. Disengage the trigger cable from the tensioning clamp.
IMPORTANT: Always disengage the trigger cable from the
tensioning clamp before making any adjustments to the
spray gun position.
b. Loosen the support bar clamps and slide the gun
support bar to the desired horizontal position.
c. Loosen the gun riser clamp and slide the spray gun to
the desired vertical position.
NOTE: The height of the spray gun affects the width
of the spray pattern (i.e., the lower the gun, the
smaller the line width). Tip size also affects line
width.
4. Install the second gun assembly, if desired. Refer to the
installation instructions for the second gun assembly in the
Parts List section of this manual.
5. Set the trigger selector for proper spray gun operation.
The gun lever on the right handlebar triggers the gun or
guns. The selector on the trigger must be set for the rst
gun, both guns, or the second gun .
IMPORTANT: Always turn the trigger lock on the spray gun
to the locked position before making any adjustments to
the trigger selector. Also, release the trigger cable from its
block by lifting the cable up and out of the block. There will
be a brief triggering of the gun while releasing the trigger
cable.
a. First Gun — The rst gun
position is with the selector
in the left position. Push
the lever toward the inside
of the frame until the pin
engages the left plate.
b. Both Guns — The dual
gun position is with the
selector in the center
position. Push the lever
toward the center position
until the pin engages both
plates. The pin must
engage both plates.
c. Second Gun — The
second gun position is
with the selector in the
right position. Push the
lever away from the inside
of the frame until the pin
engages the right plate.
6. Fill the oil cup 1/2 full with Titan Piston Lube (P/N 314-
480) supplied by the factory. This extends packing life.
7. Check the hydraulic uid level daily before starting the
sprayer. The hydraulic uid level should be at the “Full”
mark on the dipstick. Refer to the Maintenance section of
this manual for hydraulic system maintenance instructions.
IMPORTANT: Use of Titan’s Coolflo™ Hydraulic Fluid (P/N
430-361) is mandatory in the hydraulic system. Do not use
any other hydraulic fluid. Use of any other hydraulic fluid
may seriously damage the hydraulic system and will void
the warranty.
8. For gas models, check the engine oil level daily before
starting the sprayer. The gasoline engine oil level is
determined by the engine manufacturer. Refer to the
engine manufacturer’s service manual supplied with this
sprayer.
9. For electric models, use a 20 amp service outlet. Always
locate the electric model within 10 to 15 feet of the service
outlet. Use a short electric cable and a long paint hose.
Any extension cord will create some voltage drop. If an
extension cord is necessary, use only a grounded 3-wire
#12 extension cord.
NOTE: If the sprayer is being operated in an area that is
overloaded by other appliances or low voltage
conditions, it is important to start the sprayer
“unloaded.” Tip the electric motor forward so
that the belt is loosened and the motor starts
without full load. This reduces the amperage
draw on starting and may avoid tripping the
circuit breaker.
10. Make sure the sprayer is grounded. All sprayers are
equipped with a grounding lug. A grounding cable (not
supplied) should be used to connect the sprayer to a true
earth ground. Check your local electrical regulations for
detailed grounding instructions. See the Accessories
and Service Kits section near the back of this manual for
grounding cable ordering information.
