


16
AXIS Q1755/-E - Video & Audio
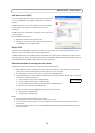
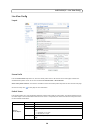
Stream Profiles
There are four pre-programmed stream profiles available for quick set-up. These settings can be adjusted and new, customized
profiles can be created. Each profile has a descriptive name, describing its usage and/or purpose. The profiles can be accessed
from the Live View page.
• To create a new stream profile, click Add... to bring up
the Stream Profile Settings dialog.
1. Enter a unique name and a description for your profile.
2. Select a Video encoding (H.264 or MJPEG) from the drop-down list.
3. Modify the stream settings under the Image, Audio, H.264 and MJPEG tabs. See
Video Stream,
on page 14.
4. Click OK to save the profile.
• To copy an existing st
ream profile, click Copy... and enter a new name. Change the stream profile settings as above.
• To modify an existing stream profile, click Mo
dify... and change the settings as above. The original settings for the
pre-programmed profiles can always be restored by clicking Restore.
• To remove a stream profile, click Re
move. Pre-programmed profiles cannot be removed.
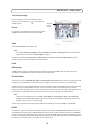
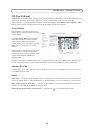
Camera Settings
This page provides access to the image settings for AXIS Q1755/-E.
Image Appearance
Brightness - The image brightness can be adjusted in the range 0-100, where a higher value produces a brighter image.
Sharpness - Controls the amount of sharpening applied to the image.
IR cut filter - Set this filter to Off to
allow the camera to 'see' infrared light, making the image clearer in low light condi-
tions, e.g. at night. If set to Auto, the camera will automatically switch between IR cut filter On and Off, according to the cur-
rent lighting conditions.
Rotate image - AXIS Q1755 is designed to be installed with the logotype
facing down but if the installation requires another
position, the image can be rotated to the correct orientation. Select the appropriate value from the drop-down list. Please see
the online help files for a description of each available setting.
White balance
This is used to compensate for the different colors present in different light sources, to make the colors in the image appear
the same. AXIS Q1755/-E can be set to automatically identify the light source and compensate for its color. Alternatively, the
type of light source can be manually selected from the drop-down list.
Exposure Settings
Configure the exposure settings to suit the image quality requirements in relation to lighting, frame rate and bandwidth
considerations.
Enable Backlight compensation - Backlight compensation makes the subject appea
r clearer when the image background is
too bright, or the subject too dark.
Exposure control - this setting is used to adapt to the amount/type of
light being used. Available settings are Manual Shut-
ter, Manual Iris or Manual where all settings are available.
Max exposure time - this setting defines the max exposure time if Exposure c
ontrol is set to Auto.
Once satisfied, click Save. Click Vie
w to view the video stream with the current configuration.
Please see the online help files for a description of each available setting.