


4
111
Customization
Assignable Buttons
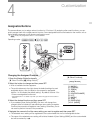
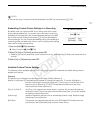
The camera allows you to assign various functions to 15 buttons*. By assigning often-used functions, you can
quickly access them with a single press of a button. Some assignable buttons are located on the monitor unit so
their availability depends on the camera configuration used.
* In mode, only assignable buttons 1 to 9 are available.
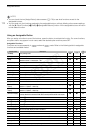
Changing the Assigned Function
1 Open the [Assign Button] submenu.
[w Other Functions] > [Assign Button]
2 Select the button to change and then press SET.
• A list of available functions appears.
• The quick reference to the right shows the default settings for each
assignable button. Also, the label on the camera for assignable
buttons 1 to 9 indicates the default setting*. By default, buttons 10 to
15 have no assignable function set.
* Assignable button 7 is usable only when you attach the grip unit of the C300 or
C300 PL.
3 Select the desired function and then press SET.
• If you selected [User Setting (NONE)], the menu will change from
orange to blue to indicate you are selecting a menu setting to register.
Continue the procedure to register a menu setting. Otherwise, you do
not need to perform the rest of the procedure.
4 Navigate the menus to find the menu setting you want to register and then press SET.
• The selected menu setting will be registered to the customizable slot and to the assignable button.
• The name of the selected menu setting will be listed instead of [User Setting (NONE)] and the customizable
slot will be marked by a ¥.
Operating modes:
[w Other Functions]
[Assign Button]
[1 MAGN.]
[2 PEAKING]
[3 ZEBRA]
[4 WFM]
[5 LENS EXCHANGE]
[6 LUT]
[7 MAGN.]
[8 WFM]
[9 EDGE MON.]
[10-15 (NONE)]
COPY