


Power Spot 700 II™
©Elation Professionals® Los Angeles, Ca. - wwww.ElationLighting.com - Page 35
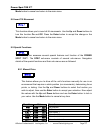
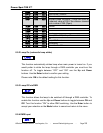
9.2.2 Access the main menu and select the AUDI function, this will give you
access to the audio submenu. See page 25 for the menu breakdown.
9.2.3 In the audio submenu choose the audio chase speed, fast or slow. Slow
(ASLW) will trigger the chase sequence to every two beats, while fast
(AFST) will trigger the chase impulse every beat. See page 25 for more
details.
9.2.4 Be sure the Master (MSTR) function is switched “ON,“ and the SVPT
function is switched “OFF.“
9.2.5 Choose your room size. The size function allows you to choose the
approximate size of the room (NORM, BIG, MIDL, SMAL). The built-in
programs will automatically adjust to your selection to optimize light
output for your room.
9.2.6 Use the sound sensitivity knob on the side control panel to make the
unit more or less sensitive to sound. Turning the knob in clockwise
direction will make the unit more sensitive to sound, while turning the
knob counter-clockwise will make the unit less sensitive to sound. Note:
This unit will react to the low frequencies of a sound source, tapping on
the fixture or high-pitched sound may not trigger the fixture.
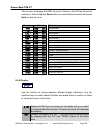
9.3 Master-Slave Operation (Sound Active): This function will allow you to link up to 16
fixtures together and operate without a controller. The fixtures will be sound activated.
In Master-Slave operation one fixture will act as the controlling fixture and the others
will react to the controlling fixtures programs. Any fixture can act as a Master or as a
Slave.
9.3.1 Using standard XLR microphone cables, daisy chain your fixtures together
via the XLR connector on the rear of the fixtures. Remember the Male
XLR connector is the input and the Female XLR connector is the output.
The first fixture in the chain (master) will use the female XLR connector
only - The last fixture in the chain will use the male XLR connector only.
For longer cable runs we suggest a terminator at the last fixture.
9.3.2 Follow the same procedures listed in the previous Stand-Alone section.