


EPSON Stylus Photo 750
8 -
EPSON Stylus Photo 750
2/99
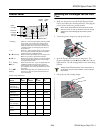
Replacing an Ink Cartridge
You can replace a cartridge when the
B black or
A color ink
out light is either flashing or on. (If you perform these steps
when both ink out lights are off, the printer cleans the print
heads, as described in “Cleaning the Print Head” on page 9.)
Use these EPSON ink cartridges within six months of
installing them and before the expiration date on the package:
Black ink cartridge S020187
Color ink cartridge S020193
To ensure good results, use genuine EPSON
cartridges and do not refill them. Other products may
cause damage to your printer not covered by
EPSON’s warranty.
Follow these steps to replace ink cartridges:
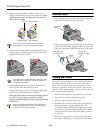
1. Make sure the printer is turned on and not printing, then
open the printer cover.
2. Press the
R cleaning button and hold it for about three
seconds until the print head moves left and the
Ppower
light begins flashing.
To avoid damaging the printer, never move the print
head by hand.
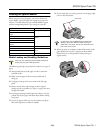
3. Pull up the ink cartridge clamp. The cartridge rises up from
its holder.
4. Lift the cartridge out of the printer and dispose of it
carefully.
If ink gets on your hands, wash them thoroughly with
soap and water. If ink gets into your eyes, flush them
immediately with water.
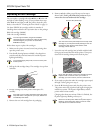
5. Remove the new ink cartridge from its packaging.
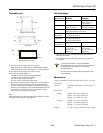
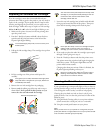
6. Remove only the yellow part of the tape seal on top as
shown below. Don’t pull off the blue portion or try to
remove the clear seal underneath the cartridge.
You must remove the yellow tape from the top of the
cartridge or you will permanently damage it. Do not
remove the clear seal from the bottom of the
cartridge; ink will leak out
7. Lower the new ink cartridge into its holder with the label
facing up and toward the back of the printer. Then press
down the ink cartridge clamp until it locks in place.
Don’t open the clamp or remove a cartridge except to
replace it with a new one. Once you remove a
cartridge, you can’t reuse it, even if it contains ink.
8. If you need to replace the other ink cartridge, repeat steps 3
through 7 before going on to step 9.
9. Press the
R cleaning button and close the printer cover.
The printer moves the print head and begins charging the
ink delivery system. The
Ppower light flashes, and the
printer makes various sounds.
Charging takes about one minute. When it’s finished, the
Ppower light stops flashing and stays on.
Never turn off the printer while the
P
power light is
flashing, unless the printer hasn’t moved or made
any noise for more than 5 minutes.
black cartridge color cartridge
Remove the yellow tape