


64 65
Advanced Features
3
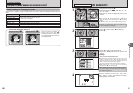
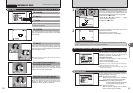
A countdown appears on the screen indicating the
time remaining until the picture is taken.
Self-timer mode is canceled after each shot.
99
4
10 SEC10 SEC
1
2
SETSET
AUTOAUTO
OFFOFF
OFFO F F
:
:
:
:
:
OFFOFF
0
:
ISO
200
66
NNN
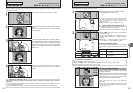
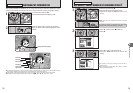
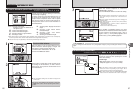
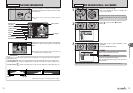
1Position the AF frame over the subject.
2Press the shutter button down halfway to focus
on the subject.
3Without releasing the shutter button, press the
button all the way down (fully pressed) to start
the self-timer.
Bebeep
Beep
ISO
200
66
NNN
2
01
02
03
●
!
The AF/AE lock can be used (➡P.28).
●
!
Take care not to stand in front of the lens when pressing the
shutter button as this can prevent the correct focus or
brightness (exposure) from being achieved.
The self-timer lamp lights and then starts blinking
until the picture is taken.
●
!
To stop the self-timer, once it has started running, press the
“DISP/BACK” button.
3
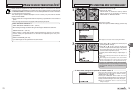
PHOTOGRAPHY MENU
PHOTOGRAPHY MENU
✽ Displaying the menus (➡P.63)
Ä
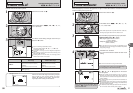
SELF-TIMER PHOTOGRAPHY
Available Photography modes: B, √, À, U, ,, /, N, M, <, >
The self-timer is used in situations where the
photographer is included in the shot.
When selecting the self-timer setting, the self-timer
icon appears on the screen.
*: The picture is taken after 10 seconds.
(: The picture is taken after 2 seconds.
●
!
Any of the following cancels the self-timer setting:
i Completing the shooting
i Changing the Mode dial setting
i Setting the camera to Playback mode
i Turning the camera off
1
◆
Using the 2-second self-timer
◆
This is useful when you have the camera on a tripod and you want to prevent camera shake.
64
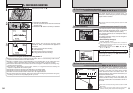
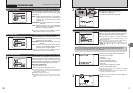
SETTING PHOTOGRAPHY MENU
PHOTOGRAPHY MENU
Ä
Self-timer ➡P.65
Use this setting for taking pictures such as
group shots where the photographer is included
in the shot.
A
White balance ➡P.66
Change this setting to suit for the surroundings
and lighting.
â
High-speed shooting ➡P.67
Use this setting to reduce the time required for
focusing.
H
AF mode ➡P.68
Set the focusing method.
G
Sharpness ➡P.69
Use this setting to soften or emphasize outlines
or to adjust the quality of the image.
Ô
Flash brightness adjustment
➡P.69
Change this setting to adjust the amount of light
emitted by the flash to suit the photography
conditions or to achieve a desired effect.
È
Multiple exposure ➡P.71
Multiple exposure provides a way of overlaying
images on top of each other to give a final
image.
Á
Bracketing ➡P.70
Use this setting to photograph the same image
with different exposure settings.
Ê
External flash ➡P.72
Select the external flash setting to use an
external flash.
“
Contrast ➡P.70
Use this setting to adjust the contrast.
‘
Saturation ➡P.70
Use this setting to adjust the lightness of color.
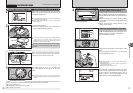
■ Self-timer lamp display
*
Lit for 5 seconds ➡ Blinking for 5 seconds
(
Blinking
for 2 seconds
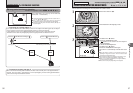
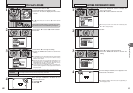
1Press the “MENU/OK” button to display the
menu on the monitor.
2Press “d” to move to page number.
3Press “a” or “b” to select the page.
SHARPNESSSHARPNESS
1
2
EVEV
OFFOFF
OFFOFF
HARDHARD
STDSTD
SOFTSOFT
STDSTD
STDSTD
STDSTD
1
3
:
:
:
:
:
:
1Press “c” to move to menu item.
2Press “a” or “b” to select the menu item.
01 02
2
Changing the page number
PAGE PA G E
1
1
2
:
:SET:SET
:AUTO:AUTO
:OFF: O F F
:OFF:OFF
: 0: 0
1
01 02 03