


14
Set Slideshow Shuffle
You can set the slideshow to display your photos in a random ‘shuffle’ order, or display them in the order as stored on
the selected media source.
1. On the
HOME screen, press
to display the
Setup Menu.
2. Select
Slideshow Setup.
3. Use
to select Slideshow Shuffle, and then use
to select your desired setting.
ON = Displays photos randomly
OFF(default) = Displays photos in the order found on selected media source
4. Select Done.
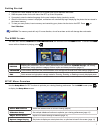
CALENDAR/CLOCK
Your DPF can be used as a personal desk calendar which displays a continuous slideshow of photos on the selected
media source, and real-time clock. To display the
CALENDAR/CLOCK screen, select CALENDAR from the HOME screen.
The slideshow will be displaying photos found on the currently selected media source.
Select Media Source for Calendar Slideshow
You can easily change the media source if you want the calendar/clock slideshow to display photos from a different
media source (i.e., memory card, slideshow folder).
On the
CALENDAR/CLOCK screen, press , and then select the Media Source button in the upper right corner.
Select the desired media source from the
Select Media screen.
Set Schedule
You can schedule the DPF to automatically go into a “stand-by” mode and resume operation according to your weekly
schedule. For example, if you have your DPF on your desk at work, you may want to display the calendar/clock or
play a slideshow from 8:30am to 5:30pm every weekday, and then set the DPF to remain in stand-by mode
throughout the weekend. The following Monday morning, the DPF would resume operation at 8:30am.
1. On the
CALENDAR/CLOCK screen, press .
2. Select
Set Schedule.
3. Use
to move between the fields and
to change the field values in Weekdays On/Off.
4. To set the Weekends On/Off, select the Enable Weekends Schedule button, and then use
to access the
settings.
5. Use
to move between the fields and
to change the field values in
Weekends On/Off.
6. When correct times are set, select
Done to return to the previous screen.
Disable Schedule
After the schedule has been enabled (per above instructions), you can disable the schedule whenever desired.
1. On the
CALENDAR/CLOCK screen, press .
2. Select
Set Schedule, and then select the Enable Weekdays Schedule or Enable Weekends Schedule button.
The time fields will display
OFF.
3. Select
Done.