


9
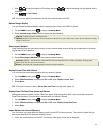
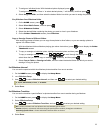
STYLE 1 2 3 4 = Select the background image appropriate for your greeting (can also be your personal photo)
DEL = Clears the entry field
= View your greeting with selected background image
TITLE MSG = Toggle between the Title and Message entries
ABC/abc/SYM = Toggles between upper and lower case letters, and the following symbols:
_ ! : ; $ ( ) [ ] \ & / % ^ ! + = ~ - | < > { }
= Scroll through your entry to edit as needed
Backspace = Erases last selected character
Done = Completes entry
Cancel = Return to the previous screen without an entry
Note: You can also use the remote control buttons as follows:
‘
+’ = Scroll forward through entry to edit as needed
‘
-‘ = Scroll back through entry to edit as needed
ROTATE = Backspace, erases last selected character
ZOOM = Toggles between ABC / abc / SYM screens
Enter Greeting
1. On the HOME screen, press
to display the
Setup Menu screen.
2. Select
Greeting Card.
3. Select Yes to create a new greeting or delete existing greeting, or select No to edit existing greeting.
4. Enter a greeting
Title (i.e., Happy Birthday, Merry Christmas).
5. Select the
TITLE MSG button to toggle between the Title and Message entry screens.
To enter multiple lines of text, use either the TITLE MSG button or the ↵ located on the #1 key (depending on
model).
TIP: If entering multiple lines, to avoid losing your progress should you leave the unit or have a power
interruption, it is recommended that you select
Done periodically to save your message.
6. Select
STYLE 1 2 3 4 to choose a background appropriate for your greeting.
Style 1 Default – Blue with scroll (or your personal photo – see Assign Personal Background Image on page 9)
Style 2 – Balloons
Style 3 – Gift with gold ribbon
Style 4 – Roses
7. Select VIEW to view your greeting, and then press
to return to the keyboard screen.
8. When satisfied with your greeting, select
Done to save.
Assign Personal Background Image
You can enhance your personal greeting even more by assigning one of your own photos as the greeting
background.
1. Choose the photo you want as your background, and then name it exactly
showme.jpg.
IMPORTANT: showme.jpg must be a standard JPG and not in a progressive format
2. Copy your showme.jpg file into the root folder of the DPF’s internal memory. Use the DPF to PC – USB
Connection instructions (page 15) to copy the file to the root folder (do not copy into Photos folder).
3. Follow steps 1-6 under
Enter Greeting (above), and select the Default style.