


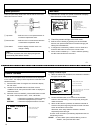


Setting White Balance mode
1) Press the SET button for longer than 2 seconds to display
the “MAIN MENU”.
2) Use the UP and DOWN buttons to shift the cursor to
“WHITE BALANCE”, then press the SET button to display
the “WHITE BALANCE MENU”. But, it does not move to
“WHITE BALANCE MENU” at the time of B/W image
condition by B/W MODE setting.
3) While the cursor is at “MODE”, press the SET button to shift
the mode in the sequence “ATW”, “AWC” and “MANUAL”.
Factory setting is “ATW”.
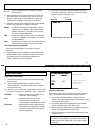
White Balance Menu [Only KP-DE500 type]
・ATW (auto tracking white balance)
Ordinarily use this mode, which is suitable for lighting
color temperature from 2,500K to 8,000K.
Setting ATW Range (Color temperature flattery range)
1) Use the UP and DOWN buttons to shift the cursor to
“ATW RANGE”.
2) Press the SET button to shift the mode in the sequence
“NORMAL”, “SPECIAL”. Factory setting is “NORMAL”.
NORMAL : From 2,500K to 8,000K
SPECAIL : From 2,500K to 8,000K, and special
lighting such as the mercury lamp and
sodium vapor lamp
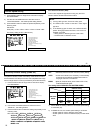
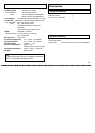
WHITE BALANCE MENU (MODE: ATW)
◆ WHITE BALANCE MENU ◆
>MODE :ATW
ATW RANGE :NORMAL
WB AREA :OFF
RET
END
…… Select White Balance mode
…… ATW Range setting
…… Select WB area mode
…… Return to the main menu
…… End of menu display
NOTE
1) Please set “ATW RANGE” to the “SPECIAL” mode
when you use sodium lighting. The color
distinction becomes possible though the white
balance may not be completely suitable.
2) White balance cannot be fully adjusted in the
following situations.
・ Most of the scene is a single color or there is very
little white component.
・ Background is red or blue.
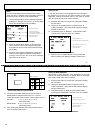
Setting WB detection area
1) Use the UP and DOWN buttons to shift the cursor to
“WB AREA”.
2) Press the SET button to shift the mode in the sequence
“OFF”, “ON(NO.*)”. [*1~9] Factory setting is “OFF”.
OFF : All the screens
ON(NO.*) [*1~9] : Only the selection area
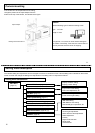
3) When the display is turned “ON(NO.*), “AREA SELECT” is
displayed in the line in the under.
4) Shift the cursor to “AREA SELECT” and push the SET
button to display the detection area(WB) select menu.
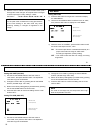
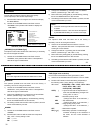
AREA(WB)
NO.1
┏━━━━━━┓
┃ ┃
┃ ┃
┗━━━━━━┛
DETECTTION AREA
(
WB
)
SELECT MENU
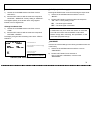
Detect area position
6 5
4
2
1 3
7
8 9
5) There are 9 white detect areas selected by the UP and
DOWN buttons. Select the areas from nos. 1 to 9 that
include the subject of main interest. (Factory setting is NO.1)
UP button : 1→2→3→4→5→6→7→8→9
(ascending order)
DOWN button : 9→8→7→6→5→4→3→2→1
(descending order)
6) After deciding the detection area, push the SET button to
return to the “WHITE BALANE MENU”.
25
26