


Getting Started - Identifying Controls
pg. 30 - 31 -
31
Getting Started - Identifying Controls pg. 30
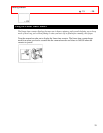
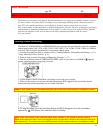
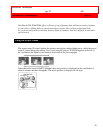
Left side / Front Controls Illustration
1. Lens
F1.8 (5~60mm) 12:1 power zoom lens with auto focus and auto iris functions.
2. Record Indicator
This indicator lights when the camera/recorder is recording.
3. Infrared Receiver
The area where infrared signals from the wireless remote are received. Aim the remote control to this area
for best results.
4. INST. ZOOM (Instant Zoom) Button
Use this button to magnify the image being recorded 1.5 times momentarily.
5. Power Zoom Switch
Use this to zoom automatically ("Using the Power Zoom," p 32).
6. CAMERA/OFF/VIDEO Power Switch
Hold down the red button as you slide the switch to CAMERA or VIDEO. You do not need to hold down
the red button to slide the switch to OFF.
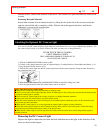
7. EJECT Switch
A power source must be connected before cassettes can be inserted or removed though the
CAMERA/OFF/VIDEO switch may be set to OFF ("Inserting and Removing Cassettes," p 17).
8. Microphone (For VM-E58A)
9. EIS (Electronic Image Stabilizer) Button(Only for VM-E58A)
EIS corrects slight shaking of an image ("Using the Electronic Image Stabilizer," p. 34).
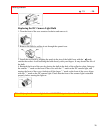
10. BATT EJECT (Battery Eject) Switch
Slide this switch to remove the battery, battery case or external power adapter.
11. Cassette Holder Close Button
CAUTION: Be sure to press this button to close the cassette holder. Otherwise, the tape may become slack
and may be damaged.
12. Cassette Holder
A power source must be connected to the camera/recorder before a cassette can be inserted or removed.