HD3MDIP/X Network Camera Reference Guide
Document 800-04132V1 Rev A 37
01/10
Updating IP Network Settings Automatically
1. In the Discovery pane, select the device and click Connect .
2. From the System tab click the Obtain an IP Address automatically check box.
3. Enter a Device Name, for example, FrontLobbyDome01.
4. Click Apply.
The network automatically assigns the IP Address based on the DHCP network server
details. If no DHCP server is present on the network, the hardware defaults to an
APIPA address (169.254.x.x).
Updating IP Network Settings Manually
Caution When manually updating the network settings, it is important to enter
the correct IP network settings before applying them. Incorrect values
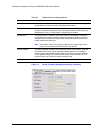
might cause a failure when connecting to the device. See Table 3-4
for definitions of each setting.
1. In the Discovery pane, select the device, and click Connect .
2. To assign a static IP address to the device, from the System tab click to clear the
Obtain an IP Address automatically check box.
3. Enter a Device Name, for example, FrontLobby01.
Note The MAC address is a factory assigned address that is unique for each
device.
4. Enter an IP Address of the device on the network.
Note The address must be in the same address range. For example, if the PC is
192.188.1.xx, then the device should be set to a similar address, for example
192.168.1.xy.
5. Enter the device Subnet Mask value. A value is required.
6. Enter a default Gateway Address that connects the device to the static network. A
value is required.
7. Click Apply.
The network settings are updated and a message displays in the status bar to confirm
the update.


