


EN
25
FOR RECORDING
Snapshot (For Tape Recording)
This feature lets you record still images that look like
photographs onto a tape.
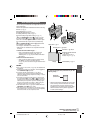
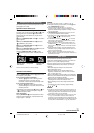
SNAPSHOT MODE SELECTION
1 Set the VIDEO/DSC Switch 4 to “VIDEO” (GR-D90/
D70 only), then set the Power Switch y to “ ” while
pressing down the Lock Button t located on the
switch. Open the LCD monitor fully or pull out the
viewfinder fully.
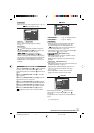
2 Press the MENU/VOLUME wheel % in. The Menu
Screen appears.
3 Rotate the MENU/VOLUME wheel % to select
“ (CAMERA)”, then press it.
4 Rotate the MENU/VOLUME wheel % to select
“SNAP MODE”, then press it.
5 Rotate the MENU/VOLUME wheel % to select the
desired Snapshot mode, then press it.
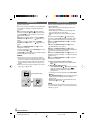
Rotate the MENU/VOLUME wheel % to select
“ RETURN” and press it twice. The Menu Screen
closes.
There is the sound effect of a shutter closing.
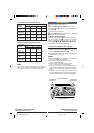
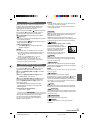
FULL
Snapshot mode
with no frame
FRAME
Snapshot mode
with frame
PIN-UP
Pin-Up mode
NOTES:
● To remove the shutter sound, ੬ “BEEP” on pg. 30.
● If Snapshot recording is not possible, “PHOTO”
y blinks
when SNAPSHOT
^ is pressed.
● If Program AE with special effects (
੬ pg. 23) is
engaged, certain modes of Program AE with special
effects are disabled during Snapshot recording. In such a
case, the icon blinks.
● If SNAPSHOT ^ is pressed when “DIS” is set to “ON”
(
੬ pg. 29), the Stabilizer will be disabled.
● The Motor Drive mode is disabled when “REC SELECT”
is set to “ / ” in the Menu Screen
(
੬ pg. 31).
● If “REC SELECT” is set to “
/ ” in the DSC
Menu Screen, still images are recorded on the memory
card as well (640 x 480 pixels).
● During tape playback as well, all snapshot modes are
available when “ COPY” is set to “OFF” in the
Menu Screen (
੬ pg. 31). However, the shutter sound is
not heard.
● During Snapshot recording, the image displayed in the
viewfinder may be partially missing. However, there is no
effect in the recorded image.
● When a cable is connected to the AV connector, the
shutter sound is not heard from the speaker, however it is
recorded onto the tape.
Auto Focus
The camcorder’s Full Range AF system offers
continuous shooting ability from close-up (as close as
approx. 5 cm (2") to the subject) to infinity.
However, correct focus may not be obtainable in the
situations listed below (in these cases use manual
focusing):
• When two subjects overlap in the same scene.
• When illumination is low.*
• When the subject has no contrast (difference in
brightness and darkness), such as a flat, one-color
wall, or a clear, blue sky.*
• When a dark object is barely visible in the viewfinder.*
• When the scene contains minute patterns or identical
patterns that are regularly repeated.
• When the scene is affected by sunbeams or light
reflecting off the surface of a body of water.
• When shooting a scene with a high-contrast back-
ground.
* The following low-contrast warnings appear blinking:
, , and
NOTES:
● If the lens is smeared or blurred, accurate focusing is not
possible. Keep the lens clean, wiping with a piece of soft
cloth if it gets dirty. When condensation occurs, wipe with
a soft cloth or wait for it to dry naturally.
● When shooting a subject close to the lens, zoom out first
(
੬ pg. 13). If zoomed-in in the auto focus mode, the
camcorder may automatically zoom out depending on the
distance between the camcorder and the subject. This will
not occur when “TELE MACRO” (
੬ pg. 29) is activated.
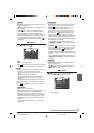
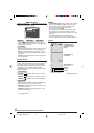
SNAPSHOT RECORDING
1 Press SNAPSHOT ^. “PHOTO” y appears while
the snapshot is being taken.
If you press during Record-Standby . . .
..... “PHOTO” y appears and a still image will be
recorded for approx. 6 seconds, then the
camcorder re-enters the Record-Standby mode.
If you press during Recording . . .
..... “PHOTO” y appears and a still image will be
recorded for approx. 6 seconds, then the normal
recording resumes.
• Regardless of the Power Switch y position (“ ” or
“ ”), Snapshot recording takes place using the
selected Snapshot mode.
Motor Drive Mode
Keeping SNAPSHOT ^ pressed provides an effect
similar to serial photography. (Interval between still
images: approx. 1 second)
1 GR-D90/70/30US EN 23-34 02.11.6, 3:12 PM25