AUTO POWER OFF Prevents the situation of forgetting to turn off the power when this is set.
“AUTO POWER OFF” (A p. 97)
QUICK RESTART Reduces the power consumption within 5 minutes after the LCD monitor is closed to 1/3 of that used during
recording.
“QUICK RESTART” (A p. 98)
DEMO MODE Introduces the special features of this unit in digest form.
“DEMO MODE” (A p. 98)
TOUCH SCREEN ADJUST Adjusts the response position of the buttons on the touch screen.
“TOUCH SCREEN ADJUST” (A p. 98)
DISPLAY ON TV Displays icons and date/time on a TV screen.
“DISPLAY ON TV” (A p. 99)
VIDEO OUTPUT Sets the aspect ratio (16:9 or 4:3) according to the connecting TV.
“VIDEO OUTPUT” (A p. 100)
COMPONENT OUTPUT Sets the definition of the video output from the COMPONENT connector.
“COMPONENT OUTPUT” (A p. 100)
HDMI OUTPUT Sets the definition of the video output from the HDMI mini connector.
“HDMI OUTPUT” (A p. 101)
HDMI CONTROL Sets the linked operations ON/OFF when the TV and this unit are connected using the HDMI mini connector.
“HDMI CONTROL” (A p. 101)
FACTORY PRESET Returns all the settings to their default values.
“FACTORY PRESET” (A p. 102)
UPDATE Updates the functions of this unit to the latest version.
“UPDATE” (A p. 102)
PC SOFTWARE UPDATE Updates the built-in PC software of this unit to the latest version.
“PC SOFTWARE UPDATE” (A p. 102)
FORMAT BUILT-IN MEM. Deletes all files on the built-in memory.
“FORMAT BUILT-IN MEM. (GZ-HM450/GZ-HM650/GZ-HM670/GZ-HM690)” (A p. 103)
FORMAT SD CARD Deletes all files on the SD card.
“FORMAT SD CARD” (A p. 103)
ERASE ALL DATA Execute this process when disposing of this unit or passing it to another person.
“ERASE ALL DATA (GZ-HM450/GZ-HM650/GZ-HM670/GZ-HM690)” (A p. 104)
CLOCK ADJUST
Resets the current time or sets to the local time when using this unit overseas.
Operating Details
“Clock Setting” (A p. 20)
“Setting the Clock to Local Time when Traveling” (A p. 23)
“Setting Daylight Saving Time” (A p. 24)
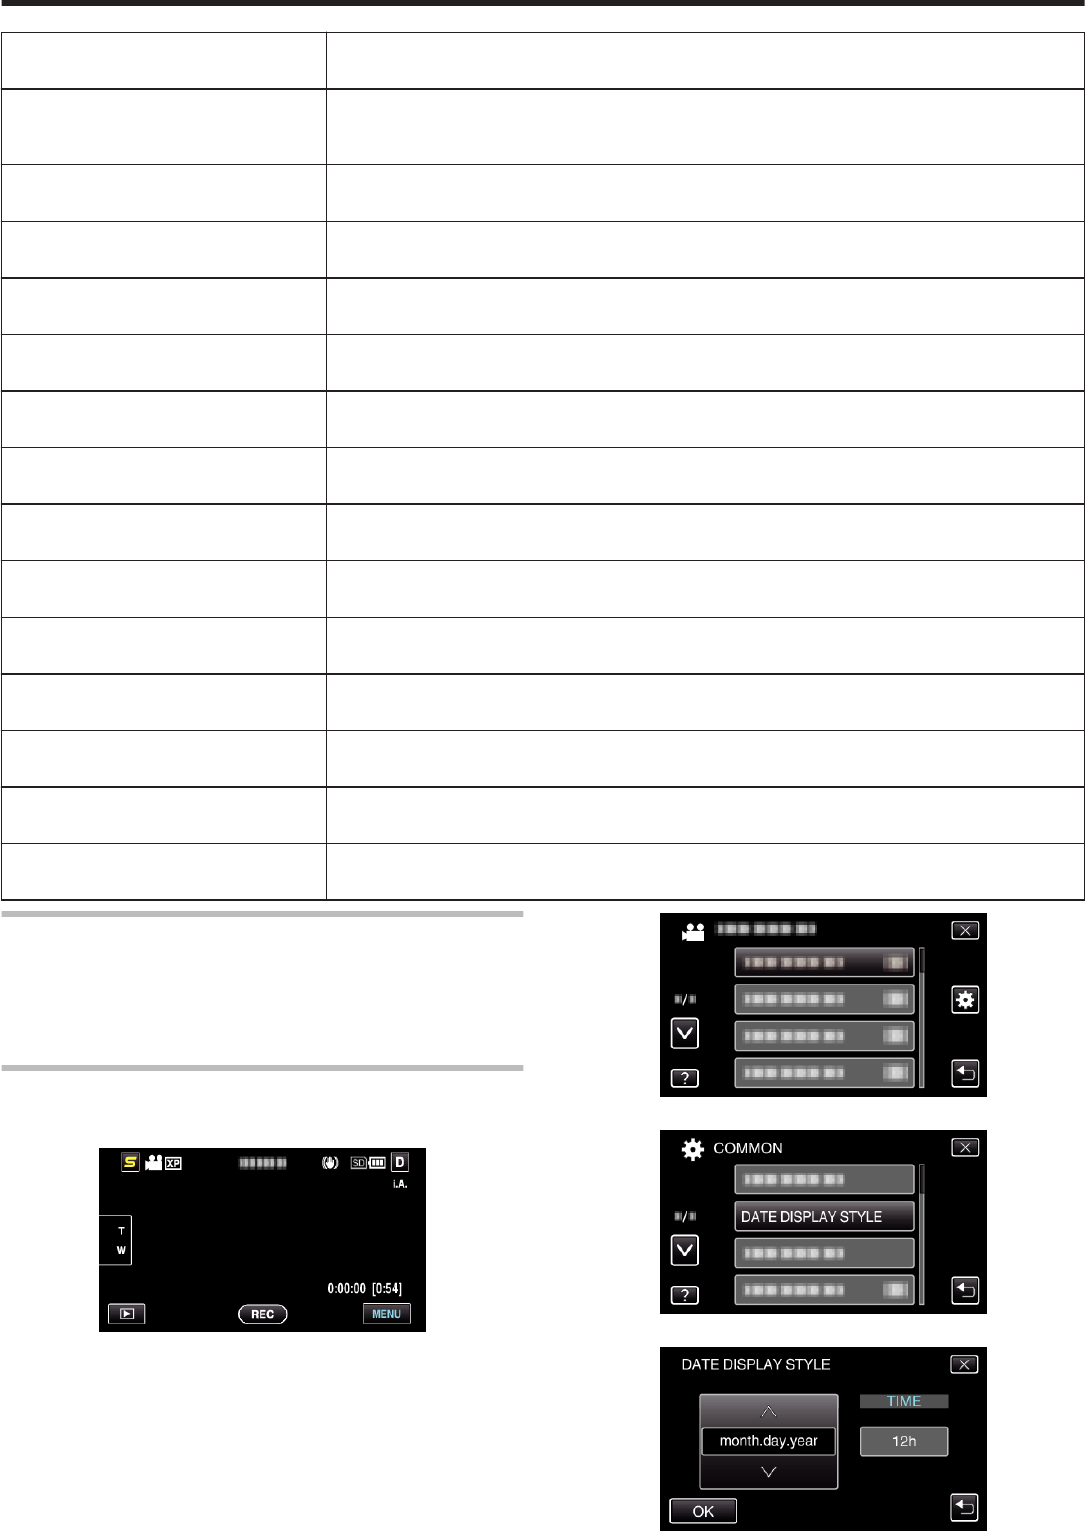
DATE DISPLAY STYLE
Sets the order of year, month, day and the time display format (24H/12H).
1
Tap “MENU”.
.
2
Tap “Q”.
.
3
Tap “DATE DISPLAY STYLE”.
.
4
Tap to set the style of date and time display.
.
Menu Settings
93


