19
ENGLISH
GETTING
STARTED
Date/Time Setting
1
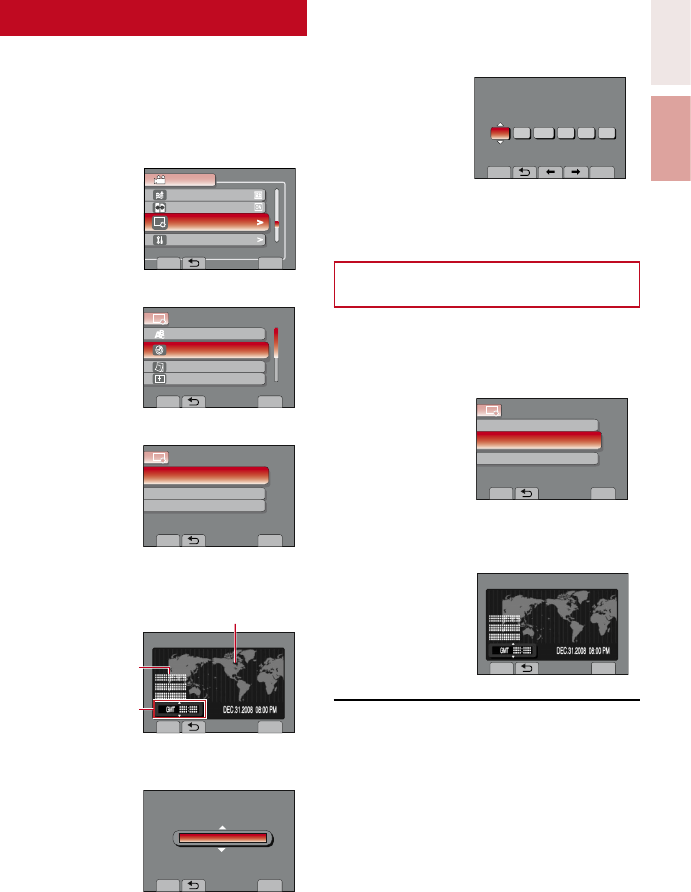
Open the LCD monitor to turn on the
camcorder.
2
Touch MENU.
3
Select [DISPLAY SETTINGS].
SETTINGS FOR BASIC
VIDEO
WIND CUT
AUTO SWITCH REC MEDIA
>
DISPLAY SETTINGS
>
BASIC SETTINGS
SET
QUIT
4
Select [CLOCK ADJUST].
DISPLAY SETTINGS
SET DATE AND TIME
LANGUAGE
CLOCK ADJUST
DATE DISPLAY STYLE
MONITOR BRIGHT
SET
QUIT
5
Select [CLOCK SETTING].
CLOCK ADJUST
SET THE CITY, DATE AND TIME
CLOCK SETTING
AREA SETTING
SET FOR DAYLIGHT SAVING TIME
SET
QUIT
6
Select the city closest to the area
where you use the camcorder.
AREA SETTING
SET
QUIT
7
Select [ON] if daylight saving time is
effective.
SET FOR DAYLIGHT SAVING TIME
SET DAYLIGHT SAVING TIME
NOV.1.2009 04.55PM
OFF
DAYLIGHT SAVING TIME (DST)
SET
QUIT
8
Set the date and time.
Select the item by using the touch sensor
and select [
}
] to set.
CLOCK SETTING
DATE TIME
GMT+ 9:00
NOV 1 2009 8 54 PM
SAVE
QUIT
DAYLIGHT SAVING TIME (DST)
9
Select [SAVE].
To reset the setting, select [QUIT]
Setting the clock to local time
when traveling
After performing steps 1-4
5
Select [AREA SETTING].
CLOCK ADJUST
SET WHEN IN ANOTHER COUNTRY
CLOCK SETTING
SET FOR DAYLIGHT SAVING TIME
SET
QUIT
AREA SETTING
6
Select the city closest to the area
you are traveling.
AREA SETTING
SET
QUIT
L
To return to the previous screen
Select
@
.
L
To quit the screen
Select [QUIT].
Selected are is highlighted
Time difference to
GMT
Principed city of
the selected area


