43
ENGLISH
COPYING
Using a DVD Burner
Supported discs: 12cm DVD-R, DVD-RW
•
Regarding DVD-R discs, only unused DVD-R
discs can be used. Regarding DVD-RW
discs, used DVD-RW discs can also be
used, but they need to be formatted before
recording. Formatting a disc deletes all
content recorded on the disc up until that
time.
•
Dual-layer discs cannot be used.
Regarding finalization after copying
The disc is automatically finalized so that
it can be played on other devices. After
finalizing, the disc is a play-only disc, so no
more files can be added.
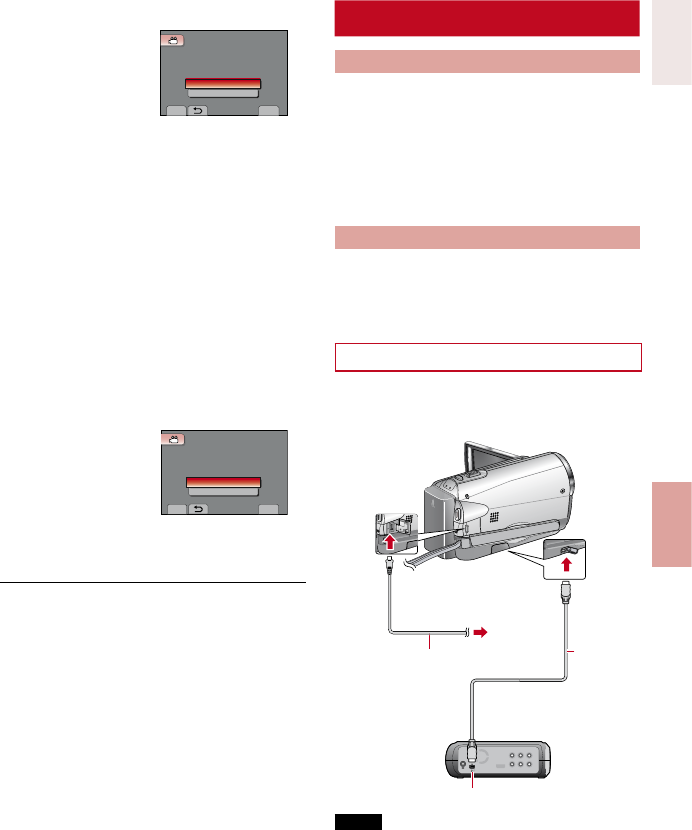
Connection with a DVD Burner
Preparation:
Turn on the camcorder first, then turn on the
DVD burner.
D
C
NOTE
•
Refer also to the optional DVD burner’s
instruction manual.
*
Use the USB cable that came with the DVD
burner.
DVD Burner
DC
Connector
USB
Connector
To AC
Outlet
USB
Cable*
USB Connector
5
Select the desired menu.
SET
QUIT
COPY VIDEO
SELECT AND COPY
SELECT THE OBJECT
TO BE COPIED
COPY ALL
• [COPY ALL]/[MOVE ALL]:
Select this to transfer all files in the
recording medium.
When the size of all files in the
camcorder is larger than the free space
of the SD card, only the files that can
be contained in the free space will be
copied.
• [SELECT AND COPY]/[SELECT AND
MOVE]:
Select when you want to transfer the
selected files.
1) Select the desired file, and touch OK.
The s mark appears on the file. To
select other files, repeat this step.
2) Select [EXEC].
6
Select [YES].
SET
QUIT
COPY VIDEO
NO
COPY QUANTITY:0016
START COPY?
YES
File transfer starts. When [COPYING
COMPLETED] / [MOVING COMPLETED]
appears, touch OK.
L To quit the screen
Select [QUIT].
L To stop the file transfer
1) Select [STOP].
2) When [QUIT?] appears, select [YES].
AC Adapter


