


70 EN
Master Page: Left
GR-DVP7-5EG_37-79.fm Page 70
The audio track can be customised only when
recorded in the 12-bit and SP modes. (੬ pg. 43)
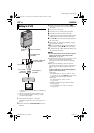
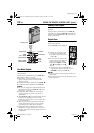
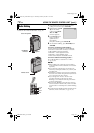
1 Play back the tape to locate the point where
editing will start, then press PAUSE (9).
2 While holding A. DUB
(D) on the remote
control, press PAUSE
(9). The “9D”
indicator appears.
3 Press PLAY (U), then
begin “narrating”.
Speak into the
microphone.
● To pause dubbing, press PAUSE (9).
4 To end Audio Dubbing, press PAUSE (9), then
STOP (8).
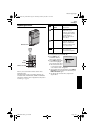
To hear the sound during Audio Dubbing...
Connect optional headphones to the headphone
connector or use the S/AV connector, and set the
“12BIT MODE” to the desired mode;
•“SOUND 1” for the playback sound.
•“SOUND 2” for the dubbed sound.
•“MIX” for the Playback and dubbed sound.
To hear the dubbed sound during playback…
Set “12BIT MODE” to “SOUND 2” or “MIX”.
(੬ pg. 38, 50)
NOTES:
● When editing onto a tape that was recorded at
12-bit, the old and new soundtracks are recorded
separately.
● If you dub onto a blank space on the tape, the
sound may be disrupted. Make sure you only edit
recorded areas.
● If feedback or howling occurs during TV playback,
move the camcorder’s microphone away from the
TV, or turn down the TV’s volume.
● If you change from 12-bit to 16-bit in mid-
recording and then use the tape for Audio
Dubbing, it is not effective from the point where
16-bit recording began.
● During Audio Dubbing, when the tape moves to
scenes recorded in the LP mode, scenes recorded
in 16-bit audio or a blank portion, Audio Dubbing
stops.
● To perform Audio Dubbing while watching on the
television, make connections. (੬ pg. 24, 25)
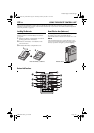
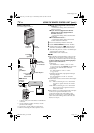
Audio Dubbing
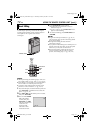
PAUSE
PLAY
A.DUB
STOP
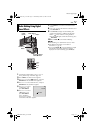
Remote sensor
Headphone
connector
Speaker
Stereo microphone
9
D
MIC
USING THE REMOTE CONTROL UNIT (cont.)
GR-DVP7-5EG_02-08.book Page 70 Thursday, February 28, 2002 11:39 AM