EN
26
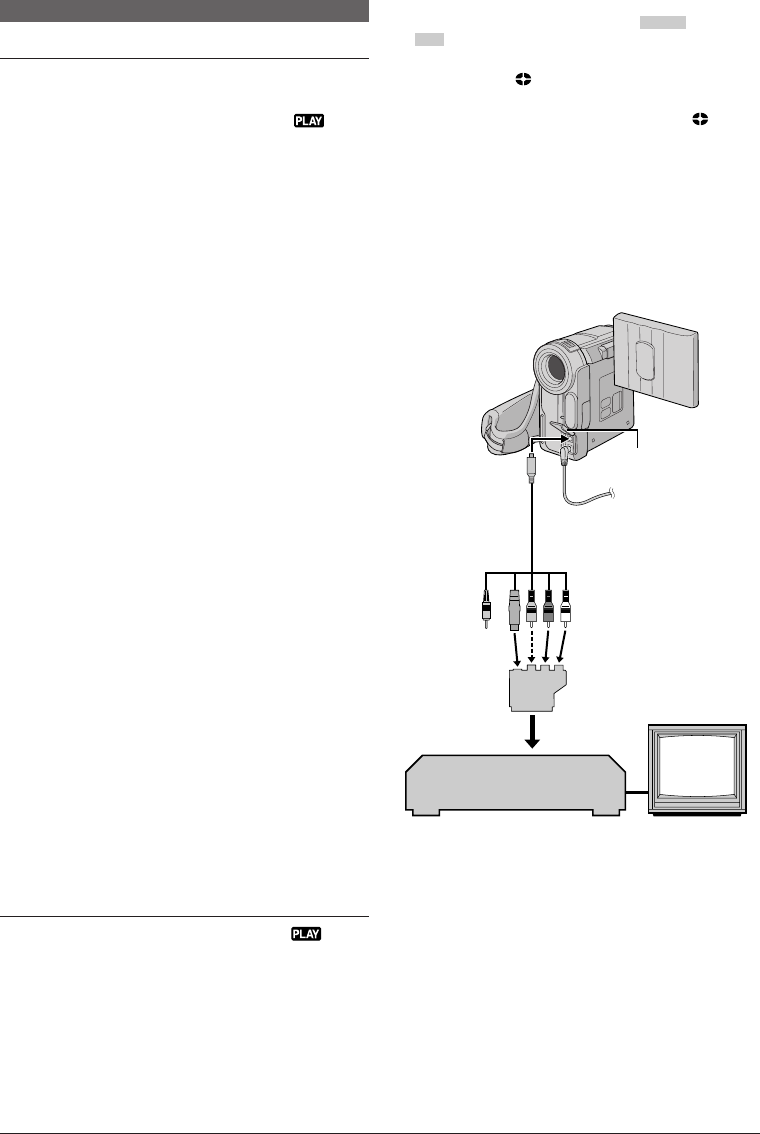
DUBBING
Connector
cover*
* When connecting the cables, open this cover.
** Connect when the S-Video connection is not used.
***If your VCR has a SCART connector
To use this camcorder as a player [ use the provided
cable adapter.
To use this camcorder as a recorder [ use a
commercially available output cable adapter.
VCR
TV
To S/AV
#
S-Video/Audio/Video/Editing
cable (provided)
Not
connected
Dubbing To Or From A VCR
To Use This Camcorder As A Player
1 Following the illustration, connect the camcorder
and the VCR. Also refer to pg. 15.
2 Set the camcorder’s Power Switch 8 to “ ”
while pressing down the Lock Button
0 located on the
switch, turn on the VCR’s power, and insert the
appropriate cassettes in the camcorder and the VCR.
3 Engage the VCR’s AUX and Record-Pause modes.
4 Engage the camcorder’s Play mode to find a spot
just before the edit-in point. Once it is reached, press
4
/6 7 on the camcorder.
5 Press
4
/6 7 on the camcorder and engage the
VCR’s Record mode.
6 Engage the VCR’s Record-Pause mode and press
4
/6 7 on the camcorder.
7 Repeat steps 4 through 6 for additional editing, then
stop the VCR and camcorder when finished.
NOTES:
● As the camcorder starts to play your footage it will appear
on your TV. This will confirm the connections and the
AUX channel for dubbing purposes.
● Before you start dubbing, make sure that the indications
do not appear on the connected TV. If they do, they are
being recorded onto the new tape.
● Set the video out select switch of the cable adapter as
required:
Y/C : When connecting to a TV or VCR which accepts
Y/C signals and uses an S-Video cable.
CVBS : When connecting to a TV or VCR which does not
accept Y/C signals and uses an audio/video
cable.
To choose whether or not the following displays
appear on the connected TV . . .
•Date/Time
..... set “DATE/TIME” to “AUTO”, “ON” or “OFF” in the
Menu Screen (੬ pg. 23, 25).
Or, press DISPLAY Q on the remote control to
turn on/off the date indication.
•Time Code
..... set “TIME CODE” to “ON” or “OFF” in the Menu
Screen (੬ pg. 24, 25).
•Indications other than date/time and time code
..... set “ON SCREEN” to “LCD”, “LCD/TV” or “OFF” in
the Menu Screen (੬ pg. 23, 25).
To Use This Camcorder As A Recorder
(GR-DX55/DX35 only)
1. Set the camcorder’s Power Switch 8 to “ ”
while pressing down the Lock Button 0 located on
the switch.
2. Set “S/AV INPUT” to “A/V IN” or “S IN” and set
“REC MODE” to “SP” or “LP” (੬ pg. 24).
3. Connect the cables as shown in the illustration and
load a cassette to record on.
To AUDIO, VIDEO** and
S-Video connectors
Cable
Adapter***
4. Press START/STOP s on the remote control to
engage the Record-Pause mode. “
A/V IN
” or
“
S IN
” appears on the screen.
5. Press START/STOP s on the remote control to
start recording. % rotates.
6. Press START/STOP s on the remote control
again to engage the Record-Pause mode. %
stops rotating.
NOTES:
● To use an output cable adapter (commercially available),
refer to its instructions.
● After dubbing, set “S/AV INPUT” back to “OFF”.
● Analogue signals can be converted to digital signals with
this procedure.
● It is also possible to dub from another camcorder.
01 DX55/45/35/25EK_EN 24-33 03.1.23, 1:43 PM26


