


22 EN
5S
P
L
A
Y
O
F
F
– – – – –6– – – – –
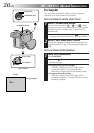
REC MODE
WIDE MODE OFF
40X
SP
ZOOM
FLASH
GAIN UP
DIS
4
TO DATE / TIME MENU
TO SYSTEM MENU
END
OFF
AGC
AUTO
ON SCREEN OFF
ONDISPLAY
DATE / TIME
DEC 25 ’ 99
PM 5 : 30
4
RETURN
RECORDING
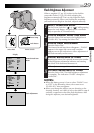
Advanced Features
Displaying The Date And Time During
Recording
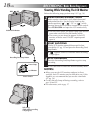
When the Power Switch is set to “ ”, “5S” or “ ”, you
can choose whether to display the date and time during
recording or not. You must first set the date and time
(“Date/Time Settings”, ੬ pg. 10). Set “DISPLAY” to “ON”
in the Date/Time Menu. The Date/Time is always
displayed when the Power Switch is set to “ ”.
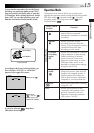
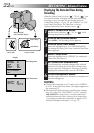
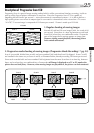
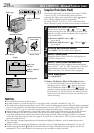
1
SELECT OPERATION MODE
Set the Power Switch to “ ”, “5S” or “ ” while
pressing down the Lock Button.
2
ACCESS RECORDING MENU
Press MENU. The Recording Menu appears.
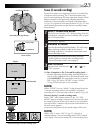
3
ACCESS DATE/TIME MENU
Move the highlight bar to “TO DATE/TIME MENU”
by rotating the Select Dial. Press it and the Date/Time
Menu appears.
4
SELECT FUNCTION
Move the highlight bar to “DISPLAY” by rotating the
Select Dial, then press it.
5
SET FUNCTION PARAMETERS
Cycle through the available settings of the selected
functions by rotating the Select Dial and stop when
the one you want is displayed. Then press it and the
highlight bar automatically moves to “RETURN”.
6
CLOSE RECORDING MENU
Press the Select Dial twice. Selection is complete and
the menu disappears.
NOTES:
●
Connect the camcorder to a TV and set “ON SCREEN”
to “ON” in the Date/Time Menu. The display appears on
the connected TV .
●
The Indicator/Display function overrides these settings.
Even if you have set “ON SCREEN” to “ON”, pressing
IND. ON/OFF for longer than 1 second removes the
indications from the screen. Pressing it for longer than
1 second again makes the indications re-appear (“LCD
Monitor/Viewfinder Indications”,
੬
pg. 17).
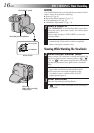
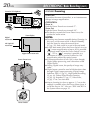
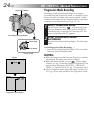
MENU Button/
IND. ON/OFF Button
Display
Select Dial Power Switch
Recording Menu
RECORDING
Advanced Features
Date/Time Menu
Lock Button
Power lamp