E-22
CONNECTION/INSTALLATION
Auto white balance control adjustment
Each light source has its own colour temperature. Therefore, when the main light source
lighting an object is changed, the white balance should be adjusted again by pressing the
AWC button.
1.
Place a white object under the same
lighting condition as the object to be shot
and zoom in to fill the screen with white.
2.
When the AWC button is pressed for
approx. one sec., the white balance is
adjusted for the object being recorded.
3.
During the time when the Auto White
function is operated, "AWC OPERA-
TION" is displayed (for approx. 0.5 sec.).
When the appropriate white balance is
acquired, "AWC OK" is displayed.
4.
Error message display
● NG : OBJECT
Displayed when there is not enough
white colour on an object or the colour
temperature is not suitable.
By taking a shot of a white object to
fill the screen, adjust the white balance
again.
● ERROR : LOW LIGHT
Displayed when the light is low. In-
crease the illumination then re-adjust
the white balance.
● ERROR : HIGH LIGHT
Displayed when the light is too bright.
Decrease the illumination then re-ad-
just the white balance.
MEMO
Even if you press the AWC button, the white
balance will not be re-adjusted during the
operation in the black-and-white mode.
CAMERA
SETUP
SET
MENU
EXT TERM-OFF
INT/GL
DUPLEX
RX TERM-OFF
NOT USED
ON
LL
SIMPLEX
ON
IRIS
AWC
VIDEO
DC
AWC button
AWC OK
DISPLAYING RESULT
AWC OPERATION
DURING OPERATION
AWC NG : OBJECT
OBJECT ERROR
AWC ERROR : LOW LIGHT
LOW LIGHTING
AWC ERROR : HIGH LIGHT
OVER LIGHTING
E-23
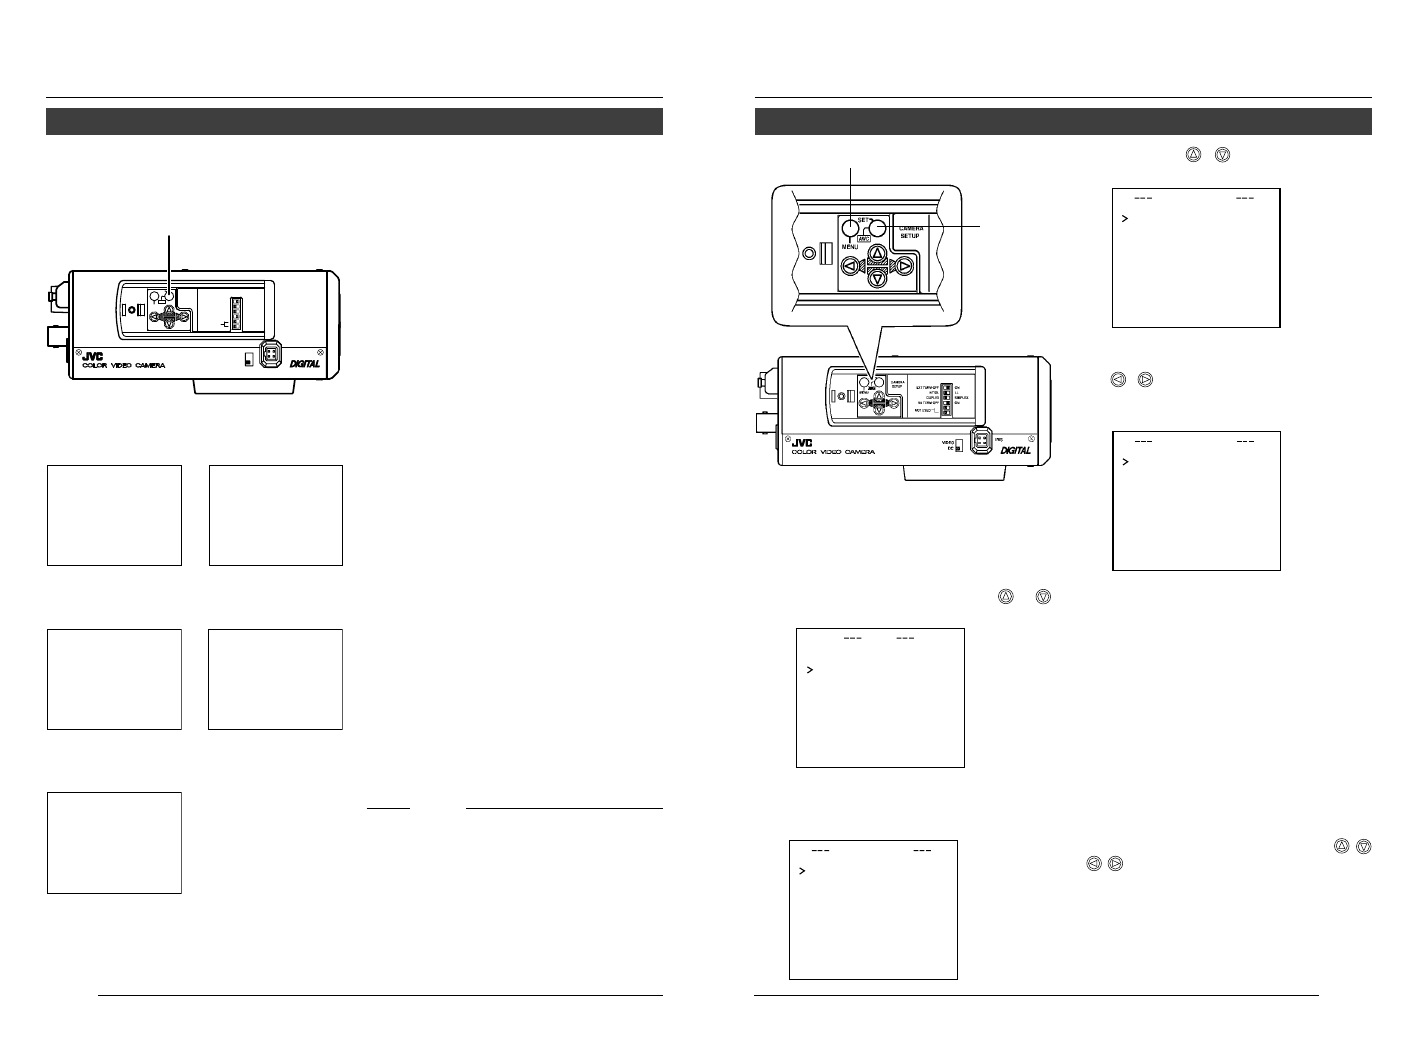
MENU SETTING
Setting the menu
1.
Press the MENU button.
The MENU screen is displayed.
2.
Set the cursor (>) to a desired
sub-menu using the
,
button.
3.
Press the SET button.
The selected sub-menu screen is
displayed.
4.
Use the , button to set the
cursor (>) to a desired item.
5.
Change the set value using the
, button.
Change of the set value displays a
change mark ().
If you wish to change the set values of
another items, repeat items
2.
to
5.
above.
6.
Press the MENU button.
The screen returns to the previous one
(MENU screen).
7.
Press the MENU button.
The screen returns to the normal screen
(quitting the menu display).
* When the setting is executed using the RM-
P2580, use a joy stick instead of the
button.
LACSETTINGS
AEVRAEG:PEAK 82:
ACGMODE
2dB0
SUTHTERExDR/
NRMALO
I
IRSLEVEL -5
OFF
PIORRITY –––
BCLOFF
SNSEEUP OFF
LUX
L
O
MODE
B&W/COLOUR MODE
..
MENU button
SET button
LACSETTINGS
IIRSLEVEL NORMAL
AEVRAEG:PEAK 82:
ACGMODE
2dB0
SUTHTERExD
LUX
R/
NRMALO
L
O
OFF
PIORRITY –––
BCLOFF
SNSEEUP OFF
MODE
B&W/COLOUR MODE
..
LACSETTINGS
IIRSLEVEL NORMAL
AEVRAEG:PEAK 82:
ACGMODE
2dB0
SUTHTERExD
LUX
R/
NRMALO
L
O
OFF
PIORRITY –––
BCLOFF
SNSEEUP OFF
MODE
B&W/COLOUR MODE
..
MENU
SYNC ADJUST
VIDEOADJUST
MODE ESLECT
ALC SETTINGS
COMMUNICATION
MAINTEN NACE
MOT ION
D
E
TECT
..
FACTORY SETTINGS..
..
..
..
..
..
..


