


20
Operation
On Screen Display (OSD)
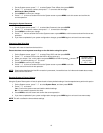
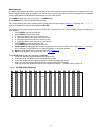
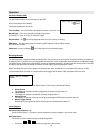
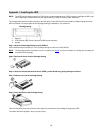
The DXR109 will display all current status on the OSD.
Here is an example of the display.
The following status will be shown:
Time and Date – The current time and date will be shown on the first line.
Record Type – The current recording method will be shown:
M= Manual, T= Timer, A= Alarm, E= External Trigger
Record Status – An icon will be displayed when the unit is currently recording
HDD Status – This will display either the remaining HDD capacity in GB or OW to indicate
that it is set to Overwrite.
Video Loss - Screen will display if the video input is not connected properly.
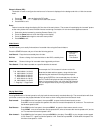
Recording Methods
The DXR109 offers a variety of flexible recording modes. The unit can be set up to record continually, following a schedule, or
by record events. In addition, the recording speed and resolution is also configurable (these options are configurable through
the system menu). Under the recording status, if power is stopped accidentally, recorded video will still be stored in the HDD
and will be available when the power is restored, and the original recording setup will remain.
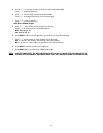
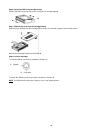
When recording, the top line of the display will show the date, time, and the amount of available HDD memory (in GB).
In the example below, the letter “A” represents the alarm trigger and the letters “OW” represents HDD over write.
There are 3 record modes for DXR109: Alarm Record, Timer Record, and Manual Record.
1. Alarm Record
The display will indicate a recording triggered by an Alarm using the letter “A”.
2. Timer Record
The display will indicate a scheduled recording using the letter “T”.
3. Manual Record
The display will indicate a manual recording (by pressing the REC button) using the letter “M”.
4. Motion Trigger Record
Recording will be triggered by motion sensing and is indicated with the letter ‘D’.
Viewing Options:
Individual Camera Select (1 - 9):
Press Camera Select (1 - 9) button to select the desired camera to display in full screen mode.
Multi View Select:
This button is used to select the ideal viewing configuration.
1. Press the buttons to toggle the camera views.
2002
–
JAN
–
01 01:02:03
A?OW
2002
–
JAN
–
01 01:02:03
E 32GB