


29
Step 1 Turn the Camera On and Select A (Auto) Mode
Basic Photography and Playback: A (Auto) Mode
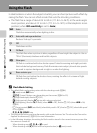
Indicators Displayed in A (Auto) Mode
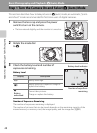
When the monitor has been turned off in standby mode to save power (the power-on lamp is
blinking) (A199), turn on the monitor again with one of the following operations.
- Press the power switch, the shutter-release button, the c button or the b (e movie-
record) button.
- Rotate the mode dial.
C Note on the Flash
When the flash is lowered, the flash setting is fixed at off and W appears at the top of the monitor. In
situations where a flash is needed, such as in dark locations or when the subject is backlit, be sure to
raise the flash (A37).
C Functions Available in A (Auto) Mode
• The flash mode (A36) can be adjusted, self-timer (A39), focus mode (A40) and exposure
compensation (A43) can be applied.
• Press the d button to specify settings for the shooting menu options Image quality (A83)
and Image size (A84).
D Vibration Reduction
• See Vibration reduction (A193) in the setup menu (A185) for more information.
• Set Vibration reduction to Off when using a tripod to stabilize the camera during shooting.
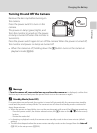
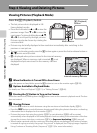
1/2501/250 F5.6F5.6
32
32
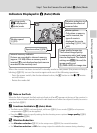
Internal memory indicator
Pictures are recorded to internal memory
(approx. 102 MB). When a memory card is
inserted, C is not displayed and pictures are
recorded to the memory card.
Aperture value (A70)
Shutter speed
(A70)
Shooting mode
A
is displayed in
A
(auto) mode.
Vibration reduction icon
Reduces the effects of
camera shake.
Image quality/image size
The current image quality
(compression ratio) and image
size are displayed. The default
settings are W (Normal) for
image quality and
G (4000×3000) for image size.
Movie options
Only when a memory
card is inserted, the
type of movie is
displayed for movie
recording (A157, 164,
165).