


12 (E)
Parts and their functions
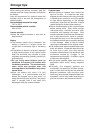
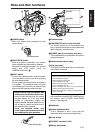
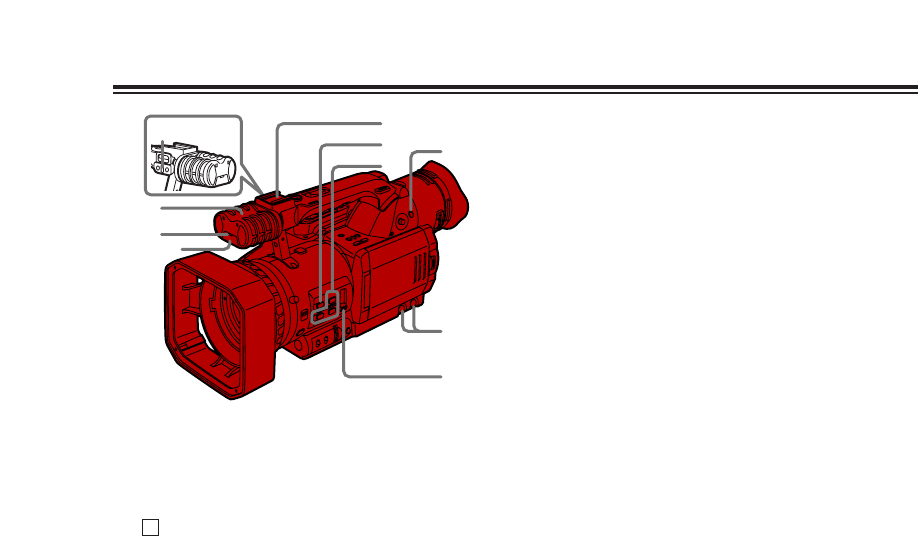
JAUTO button
When the AUTO button is pressed, the
operation mode which was set on the setting
menu AUTO SW screen is established, and
“ ” appears in the upper part of the
viewfinder and LCD monitor.
On the setting menu AUTO SW screen, the
mode of the operation to be performed
automatically (auto iris, auto gain control,
auto tracking white or auto focus) when the
AUTO button is pressed is set.
(See page 43)
The setting is released when the button is
pressed again.
KUSER1, USER2 and USER3 buttons
One of 11 functions can be allocated in turn
to each of the USER1, USER2 and USER3
buttons.
In accordance with the subject concerned,
the shooting conditions can be instantly
selected or fade effects can be added to the
images.
For details, refer to the USER1 item, USER2
item and USER3 item (page 42) on the
setting menu SW MODE screen.
LND FILTER switch
This is used to select the ND filter (for
adjusting the light quantity) to be used.
OFF: The ND filter is not used.
1/8 : The light quantity is reduced to about
one eighth.
1/64: The light quantity is reduced to about
one sixty-fourth.
A
MAUDIO controls
These are used to adjust the recording level
of the audio signals which have been input to
the built-in microphone P and INPUT 1 and 2
connectors Y.
Adjust the recording level of the audio signals
using these controls, irrespective of the
setting selected for the MIC ALC item on the
RECORDING SETUP screen of the setting
menu (page 44).
It is recommended that the centre position
normally be selected for use.
OThey cannot be used to adjust the audio
signals which have been input to the
AUDIO IN/OUT CH1 and CH2 connectors
V.
NLight shoe
A video light, for instance, is attached to this
shoe.
OMicrophone shoe
The accessory microphone holder is attached
to this shoe so that a microphone (optional
accessory), etc. can be mounted. (See page
57)
PMicrophone (built-in, stereo)
Do not apply a strong load from an external
source to this microphone as it may damage
the microphone.
QTally lamp (front)
Refer to the details on the tally lamp (rear) 8.
RRemote control sensor (front)
SMENU button
When this button is pressed, the menu mode
is established, and the setting menu screen is
displayed in the viewfinder and on the LCD
monitor.
When it is pressed again, the menu mode is
released.
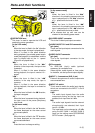
P
M
K
O
L
J
Q
S
R
N