


5
Contents
Chapter 1 General ..................................... 7
1-1 Features of the camera unit ......................... 7
1-2 Features of the VTR unit .............................. 8
1-3 Features of the Input/Output unit ................ 8
1-4 Other featuresa ............................................. 9
1-5 Dimensions drawing ..................................... 9
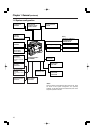
1-6 System configuration ................................. 10
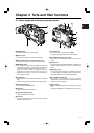
Chapter 2 Parts and their functions ...... 11
2-1 Power supply and accessory mounting
section ......................................................... 11
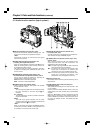
2-2 Audio function section ............................... 12
2-3 Shooting and recording/playback function
section ......................................................... 14
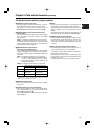
2-4 Menu operation section .............................. 17
2-5 Time code related section .......................... 18
2-6 Warning/status display section ................. 19
2-7 Display window and its displays ............... 19
2-8 Viewfinder section ...................................... 21
Chapter 3 Recording and playback ....... 22
3-1 Cassette tapes ............................................. 22
3-2 Basic procedures ........................................ 23
3-3 Scene-to-scene continuity ......................... 25
3-4 To record video signals of a few seconds
before starting recording
(PRE-RECORDING function)....................... 26
3-5 Recording in intervals
(INTERVAL REC function)........................... 27
3-6 To take the previous cut again
(RETAKE function) ...................................... 29
3-7 To check the last few seconds of the
recording (Rec-review function) ................ 29
3-8 Normal playback and playback at different
speeds .......................................................... 29
Chapter 4 Adjustments and settings for
recording ................................ 30
4-1 Multi Format ................................................ 30
4-1-1 Video system and Recording format ............... 30
4-1-2 Recording format on tapes and signal format at
output connector ............................................. 31
4-2 Adjusting the white balance and
black balance .............................................. 32
4-2-1 Adjusting the white balance ............................ 32
4-2-2 Adjusting the black balance ............................ 34
4-3 Setting the electronic shutter .................... 35
4-3-1 Shutter modes ................................................. 35
4-3-2 Setting the shutter mode and speed ............... 36
4-3-3 Setting the synchro scan mode ....................... 36
4-4 Selecting the audio input signals and
adjusting their recording levels ................. 37
4-4-1 Selecting the audio input signals ..................... 37
4-4-2 Adjusting the audio signal recording levels ..... 37
4-4-3 CH3 and CH4 recording levels ........................ 38
4-5 Setting the time data ................................... 38
4-5-1 Setting the user bits ........................................ 38
4-5-2 Setting the internal clock’s date and time ........ 42
4-5-3 Setting the time code ...................................... 43
4-5-4 Externally locking the time code ...................... 43
4-5-5 Setting the UMID information .......................... 47
4-6 Menu displays on the viewfinder screen... 48
4-6-1 Menu configuration .......................................... 48
4-6-2 Basic menu operations .................................... 48
4-6-3 Selecting the user menus ................................ 49
4-7 Viewfinder screen status displays ............ 50
4-7-1 Viewfinder lamp displays.................................. 50
4-7-2 Viewfinder screen status display
configuration..................................................... 50
4-7-3 Selecting the viewfinder screen display
items ................................................................ 50
4-7-4 Display modes and setting changes/adjustment
result messages .............................................. 56
4-7-5 Setting the marker displays ............................. 56
4-7-6 Setting the camera ID ..................................... 56
4-7-7 Mode check screen displays
(MODE CHECK button function) ..................... 57
4-7-8 Marker check screen displays
(MARKER SELECT button function) ............... 57
4-8 Selection of video output signals .............. 58
4-8-1 Settings of signals output from VIDEO OUT
connector ......................................................... 58
4-8-2 Settings of signals output from MON OUT
connector ........................................................ 60
4-9 Menu-driven function setup ....................... 61
4-9-1 Setting the USER SW GAIN switching ............ 61
4-9-2 Selecting the F.AUDIO LEVEL
control function ................................................ 61
4-9-3 Allocating functions to the USER MAIN, USER1
and USER2 buttons ........................................ 62
4-9-4 Setting the color temperature manually .......... 63
4-10 Set data handling ........................................ 64
4-10-1 Handling the setup card .................................. 65
4-10-2 Setup card operations ..................................... 65
4-10-3 How to use the user data ................................ 69
4-10-4 How to use the scene file data ........................ 70
4-10-5 Method for returning to user settings .............. 73
4-10-6 Method for returning to the factory settings ..... 73
4-10-7 Lens file ........................................................... 74
4-10-8 How to provide lens files ................................. 74
4-10-9
To save the lens file into the built-in memory
.... 75
4-10-10
To read the lens file from the built-in memory
.... 77
4-10-11To write in and read out the lens file to/from the
SD memory card ............................................. 78
Chapter 5 Preparation ............................. 80
5-1 Supplying the power ................................... 80
5-1-1 Attaching the battery and setting the
battery type ..................................................... 80
5-1-2 Use of the external DC power supply .............. 82
5-2 Attaching the lens and adjusting the flange
back .............................................................. 83
5-3 Adjusting the white shading of the lens ... 84