


43
ª
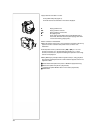
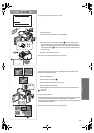
To Change the Counter Display Mode
By changing [C.DISPLAY] on the [DISPLAY SETUP]
Sub-Menu, you can change the Counter Display Mode to
Tape Counter Indication [COUNTER] (0:00.00), Memory
Counter Indication [MEMORY] (M0:00.00), and Time Code
Indication [TIMECODE] (0h00m00s00f).
(
l
12)
By
repeatedly pressing the [COUNTER] Button on the Remote
Controller, you can change the Counter Display Mode.
ª
To Display Date/Time Indication
To display Date/Time Indication, set the appropriate
Date/Time in [DATE/TIME] on the [DISPLAY SETUP]
Sub-Menu.
(
l
12)
You can also press the [DATE/TIME] Button of the Remote
Controller repeatedly to display or change the Date/Time
Indication.
ª
To Change the Display Mode
By changing [DISPLAY] on the [DISPLAY SETUP]
Sub-Menu, you can change the Display Mode to All Function
Display [ALL], Partial Display [PARTIAL] and Minimum
Display [OFF].
~~~~~~~~~~~~~~~~~~~
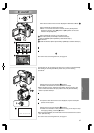
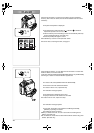
Owner ID
You can register your name and address in your Movie
Camera to identify the owner.
1
Set [CAMERA FUNCTIONS] >> [OTHER
FUNCTIONS] >> [OWNER ID SET] >> [YES].
≥The [OWNER ID] Menu appears.
2
Turn the [PUSH] Dial to select [PIN NUMBER]
and press the [PUSH] Dial to input desired
numbers.
3
Turn the [PUSH] Dial to select numbers and
press the [PUSH] Dial to enter them.
≥You can input 4 digits.
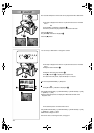
4
Push the Operation Lever towards
[
∫
∫∫
∫
]
.
5
Repeat Steps 2–4 to input desired characters
for [NAME]/[POSTCODE].
≥You can input up to 12 characters in [NAME], and up to
11 characters in [POSTCODE].
6
Push the Operation Lever towards [
∫
] to finish
the setup.
To verify Owner ID
≥Keep pushing the Operation Lever towards [;] for
approximately 5 seconds.
To Check Owner ID
If Owner ID has already been set, carrying out Step 1 above
will display [INPUT PIN NUMBER] on the screen. Input the
Pin Number you have already selected. If the number is not
correct, the screen will not change. If the number is correct,
the contents of the setup will be displayed. (By repeating
Steps 2 to 4 above, you can change the contents.)
~~~~~~~~~~~~~~~~~~~
Warning/Alarm Indications
If any one of the following indications lights up or flashes,
please check the condition of the Movie Camera.
≥
Some Indications may not be displayed according to the model.
3: Condensation has occurred.
(
l
49)
Y: The accidental erasure prevention
slider on the inserted Cassette is
open (that is, set to [SAVE]).
You are about to do audio dubbing
on the unrecorded (blank) portion of
the tape.
No Cassette is inserted.
(
l
10)
6: The Battery is low. Recharge it.
(
l
9)
0: The built-in battery is low.
(
l
16)
:: The video heads are dirty.
(
l
49)
2END: The tape came to end during
recording.
REMOTE: Wrong Remote Controller Mode has
been selected.
(
l
8)
PRINTER ERROR: The Video Printer is not connected
correctly, or the Video Printer is not
functioning properly.
UNPLAYABLE TAPE
(OTHER FORMAT): You are attempting to play back a
tape section that has been recorded
with a different TV system.
UNABLE TO A. DUB
(LP RECORDED): Because the original recording was
done in LP Mode, audio dubbing
cannot be performed.
INCOMPATIBLE
TAPE: This Cassette is incompatible.
PLEASE RE-OPERATE
AFTER PUSHING
RESET BUTTON: Mechanism Irregular is detected.
Press the [RESET] Button
(
l
6)
.
This may solve the problem.
You are attempting to record to a
Memory Card formatted with an
other equipment (like a Personal
Computer). Format the Memory
Card with this equipment.
TO SERVICE: It is a malfunction.
CARD FULL: Card does not have sufficient
memory remaining.
Select Card Mode and delete
unnecessary files.
NO CARD: Card is not inserted.
NO FILE: Card has no files recorded on it.
CARD ERROR: This Card is not compatible with this
Movie Camera.
COPY INHIBITED: Because the medium is protected by
a copy guard, images cannot be
recorded correctly.
INCORRECT
OPERATION: You are attempting to record to a
tape in VCR Mode.
In NV-GS5,
[TAPE/CARD/CARD MODE]
Selector is set to [MPEG4] or
[VOICE] when [PHOTO SHOT]
Button is pressed.
You are attempting to record to a
tape in Card Mode.
~~~~~~~~~~~~~~~~~~~
Notes and Hints
ª
Concerning the Power Supply
≥When the Movie Camera is used for a long time, the
Camera body becomes warm, but this is not a malfunction.
≥If the [CHARGE] Lamp does not light up although the
Battery is attached to AC Adaptor, detach the Battery and
reattach it.
≥Battery CGP-D110 and CGP-D105 cannot be charged with
this AC Adaptor.