


33
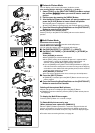
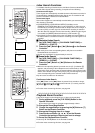
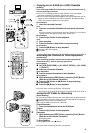
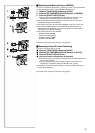
Copying on an S-VHS (or a VHS) Cassette
(Dubbing)
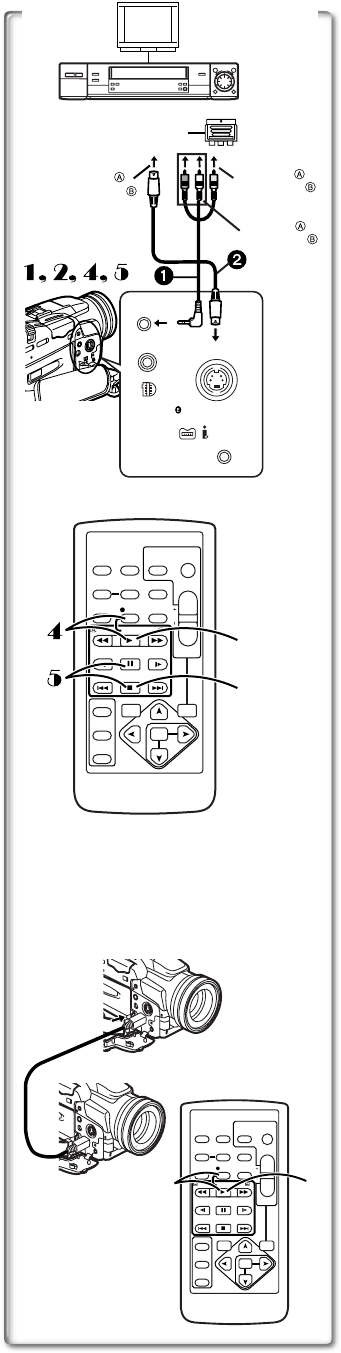
After connecting the Movie Camera and the VCR as illustrated at left
A
,
start the following procedures.
≥If your TV is not equipped with AV Input Sockets, the 21-pin Adaptor
(purchase separately) is necessary. Consult your dealer.
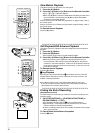
≥Be sure to press the [OSD] Button (l 8) on the Remote Controller prior to
copying so that no indications are visible. Otherwise, the displayed tape
counter and function indications are also copied.
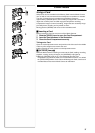
Movie Camera:
1
Insert the recorded Cassette.
VCR:
2
Insert an unrecorded Cassette with an erasure prevention
tab.
≥If various setups (such as external input, tape speed, etc.) are required,
please refer to the operating instructions of your VCR.
Movie Camera:
3
Press the [1] Button to start playback.
VCR:
4
Start recording.
5
Press the Pause or Stop Button to stop recording.
Movie Camera:
6
Press the [∫] Button to stop playback.
1
S-Video Cable (not supplied)
2
AV Cable
~~~~~~~~~~~~~~~~~~~~~~~~~
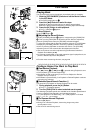
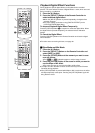
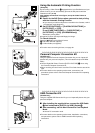
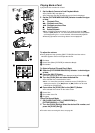
Recording the Contents of Other Equipment
(NV-MX8 only)
After connecting the Movie Camera and the other equipment as
illustrated at left
B
, start the following procedures.
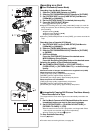
Movie Camera:
1
11
1
Set [VCR FUNCTIONS] >> [AV IN/OUT SETUP] >> [AV JACK]
>> [IN/OUT].
2
22
2
Insert an unrecorded Cassette.
Other Equipment:
3
33
3
Insert a recorded Cassette and start playback.
Movie Camera:
4
44
4
While pressing the [REC] Button, press the [PLAY] Button.
(Both are on the Remote Controller.)
5
55
5
Press the [;] Button or [∫] Button to stop recording.
Other Equipment:
6
66
6
Press the [∫] Button to stop playback.
≥For other notes concerning this item, see page 49.
~~~~~~~~~~~~~~~~~~~~~~~~~
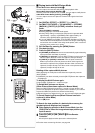
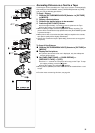
Using the DV Cable for Recording
(Digital Dubbing)
By connecting this Movie Camera with other digital video equipment that has
a DV Input/Output Terminal (i.LINK) using a DV Cable VW-CD1E (optional)
1
, dubbing can be done in the digital format.
≥Only the NV-MX8 can be used as a Recorder.
[Player/Recorder
]
1
Insert the Cassette and set to the VCR Mode.
[Player
]
2
Press the [1] Button to start playback.
[Recorder
]
3
While pressing the [REC] Button, press the [PLAY] Button.
(Both are on the Remote Controller.)
≥Recording starts.
To Stop Dubbing
Press the [;] Button or the [∫] Button.
≥For other notes concerning this item, see page 49.
[VIDEO IN]
[S-VIDEO IN]
[S-VIDEO OUT]
[AUDIO IN]
[AUDIO OUT]
21-pin Adaptor
[VIDEO OUT]
1, 3, 6
6
3
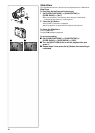
ZOOM
INDEX INDEX
SELECT
STORE
STOP
OSD
COUNTER
/REW
STILL ADV
OFF/ON
P.B.DIGITAL
DATE/
TIME
RESET
TITLE
T
W
VOL
REC
MULTI/
P-IN-P
PHOTO
SHOT
START/
STOP
A.DUB
PLAY
PAUSE
FF/
STILL ADV
MENU
ITEM
SET
VAR.
SEARCH
P.B.
ZOOM
AV IN/OUT
PHONES
S-VIDEO
IN/OUT
D.STILL
PICTURE
MIC
DIGITAL
(to USB)/
EDIT
(MINI)
DV
ZOOM
INDEX INDEX
SELECT
STORE
STOP
OSD
COUNTER
/REW
STILL ADV
OFF/ON
P.B.DIGITAL
DATE/
TIME
RESET
TITLE
T
W
VOL
REC
MULTI/
P-IN-P
PHOTO
SHOT
START/
STOP
A.DUB
PLAY
PAUSE
FF/
STILL ADV
MENU
ITEM
SET
VAR.
SEARCH
P. B.
ZOOM
2
3