


C1309M-A (9/08) 9
BENCH SETUP
DISASSEMBLE THE ENCLOSURE
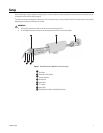
1. Use the supplied 1/8-inch hex wrench to loosen the two captive hex screws on the enclosure’s back plate.
2. Pull the “T” handle on the enclosure’s back plate to remove the enclosure sled.
3. Disconnect the ground cable from the ground stud on the inside of the enclosure’s back plate.
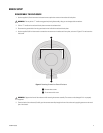
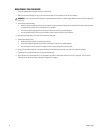
4. Use the supplied 5/64-inch hex wrench to remove the two screws on the enclosure’s front plate, as shown in Figure 3. Do not loosen the
third screw.
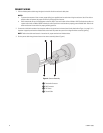
Figure 3. Removing Screws from Front of Enclosure
5. (From the back of the enclosure) Carefully push the camera assembly through the front of the enclosure by applying pressure to the metal
part of the chassis.
WARNING: Do not pull the “T” handle too aggressively during disassembly; doing so can damage cable connections.
ì
Remove these screws
î
Do not remove this screw
WARNING: Support the front of the enclosure while removing the camera assembly. The camera can be damaged if it is not properly
supported.