


91
Digital Still Camera mode Appareil photo numérique
ENGLISH
FRANÇAIS
✤ This camcorder supports the DPOF (Digital Print Order Format)
print format.
✤ You can automatically print images recorded on a Memory Stick
with a printer supporting DPOF.
✤ There are 2 ways to make a PRINT MARK.
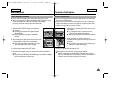
■
THIS FILE :You can set a print mark on the photo image
displayed on the LCD.
■
ALL FILES : To print 1 copy each of all of the stored images.
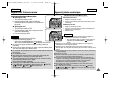
1. Set the mode switch to MEMORY STICK.
2. Set the power switch to PLAYER.
■
The last recorded image appears.
3. Using the (FWD) and (REV) buttons, search for the still
image that you want to mark.
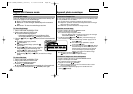
4. Press the MENU button.
5. Turn the MENU DIAL to highlight MEMORY and press the
ENTER button.
■
The MEMORY SET submenu will appear.
6. Turn the MENU DIAL to highlight PRINT MARK, press the
ENTER button.
7. Use the MENU DIAL to select either THIS FILE or ALL FILES and
press the ENTER button.
8. Use the MENU DIAL to select the quantity and press the
ENTER button.
Notes
■
When you setup the PRINT MARK option to ALL FILES, 999 files
from the current file are set to 1.
■
The ALL FILES option may require extended operation time
depending on the number of stored images.
Marking images for printing
✤
Ce caméscope supporte le format d'impression DPOF
(Digital Print Order Format).
✤
Vous pouvez ainsi imprimer automatiquement les images contenues
dans une carte Memory Stick sur une imprimante prenant ce format
en charge.
✤
Deux options s'offrent à vous :
■
THIS FILE : permet d'insérer une marque DPOF sur l'image
affichée à l'écran.
■
ALL FILES : permet de faire une copie de toutes les images stockées.
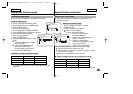
1. Placez le sélecteur de mode sur la position MEMORY STICK.
2. Réglez le caméscope sur PLAYER.
■
La dernière image enregistrée s'affiche.
3. À l'aide des touches (FWD) et (REV), recherchez l'image que
vous souhaitez marquer.
4. Appuyez sur la touche MENU.
5. À l'aide de la molette MENU, sélectionnez MEMORY et appuyez sur
la touche ENTER.
■
Le sous-menu MEMORY SET apparaît.
6. À l'aide de la molette MENU, sélectionnez PRINT MARK et appuyez
sur la touche ENTER.
7. À l'aide de la molette MENU, sélectionnez l'option THIS FILE ou ALL
FILES et appuyez sur la touche ENTER.
8. À l'aide de la molette MENU, sélectionnez le nombre d'images et
appuyez sur la touche ENTER.
Important
■
Si vous sélectionnez l'option ALL FILES, les 999 images du fichier
enregistré dans la carte mémoire sont marquées pour l'impression.
■
La durée du traitement requise avec l'option ALL FILES varie en
fonction du nombre d'images enregistrées.
Marquage des images pour leur impression
00516C SCD86(UK+FRA) (62~103) 2/11/03 8:58 AM Page 91