


ENGLISH FRANÇAIS
115115
ENGLISH
Setting the Memory
Camcorder : Using USB Mode
With the provided USB cable and a PictBridge-supporting printer, you can
print your photo images directly without connecting to a PC.
1. Press the [POWER] button to turn on the
Memory Camcorder.
◆ The Movie Record screen appears.
2. Set the
System Settings mode by pressing
the [MODE] button.
◆ The System Settings screen appears.
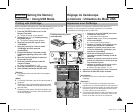
3. Move the [Joystick] left / right to select
<USB Mode>.
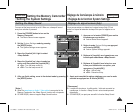
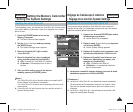
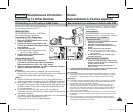
4. Move the [Joystick] up / down to select
<PictBridge> and then press the
[Joystick(OK)].
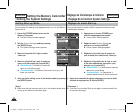
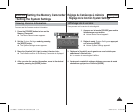
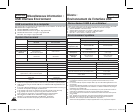
5. Connect the Memory Camcorder and the
PictBridge supporting printer with a USB
cable.
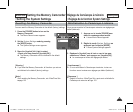
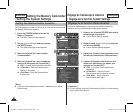
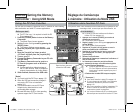
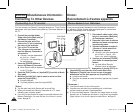
6. Move the [Joystick] left/right to select the
file you want to print.
7. Move the [Joystick] up/down to set the
number of copies.
◆ Range of possibilities: 01 ~ 30
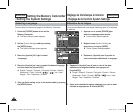
8. Press the [Joystick(OK)] to begin printing.
9. When finished, disconnect the USB cable.
[ Warning ]
✤
This function works only with printers that support
PictBridge.
[ Notes ]
✤
For printing information, refer to the user's manual of
the printer.
✤
Depending on the printer, printing failure may occur.
In this case, download JPEG files directly to the PC
and print them.
✤
Depending on the printer, date and time option may
not be supported. In this case, date and time menu
will not be displayed.
Printing with PictBridge
Réglage du Caméscope
à mémoire : Utilisation du Mode USB
Vous pouvez imprimer vos fichiers photo directement, sans raccord à un
ordinateur, si vous raccordez le Caméscope à mémoire à une imprimante
compatible avec PictBridge à l’aide du câble USB.
1. Appuyez sur la touche [POWER] pour mettre
le caméscope sous tension.
◆ L’écran Movie Record apparaît.
2. Réglez le mode
System Settings en appuyant
sur la touche [MODE].
◆ L’écran System Settings apparaît.
3. Déplacez le [Joystick] vers la gauche ou vers
la droite pour sélectionner <USB Mode>.
4. Déplacez le [Joystick] vers le haut ou vers
le bas pour sélectionner <PictBridge>, puis
appuyez sur [Joystick(OK)].
5. Raccordez le Caméscope à mémoire à l’
imprimante compatible PictBridge à l’aide du
câble USB.
6. Déplacez le [Joystick] vers la droite ou vers la
gauche pour sélectionner le fichier photo que
vous souhaitez imprimer.
7. Déplacez le [Joystick] vers le haut ou vers le
bas pour régler le nombre de copies.
◆ Nombre de copies possible : 01 ~ 30
8. Appuyez sur [Joystick(OK)] pour lancer l’impression.
9. Débranchez le câble USB lorsque complété.
[ Avertissement ]
✤ Ne fonctionne qu’avec les imprimantes compatibles
PictBridge.
[ Remarques ]
✤ Pour plus d’informations sur l’impression des photos,
reportez-vous au manuel d’utilisation de votre imprimante.
✤ Des erreurs d’impression peuvent se produire selon votre
imprimante. Dans ce cas, téléchargez les fichiers JPEG
sur votre ordinateur pour les imprimer.
✤ Les options d’impression de la date et de l’heure ne sont
pas accueillies par toutes les imprimantes. Dans ce cas,
le menu de la date et de l’heure ne s’affiche pas.
Impression avec PictBridge
4
System Settings
Move Select
OK
USB Mode
Mass Storage
PictBridge
PC-Cam
100-0001
Search PrintCopies
01
TYPE
7
System Settings
Move Select
USB Mode
Mass Storage
PictBridge
PC-Cam
100-0001
Search PrintCopies
OK
01
USB
MMC/SD
PictBridge Supporting Printer
(sold separately)
USB
USB
SC-MM11-01064A-IB-USA+FRC.indb 115SC-MM11-01064A-IB-USA+FRC.indb 115 2006-03-27 오후 4:09:302006-03-27 오후 4:09:30