2
3
4
5
ENGLISH
Video Mode : Setting Various Functions
4949
ENGLISH
Video Mode : Setting Various Functions
4848
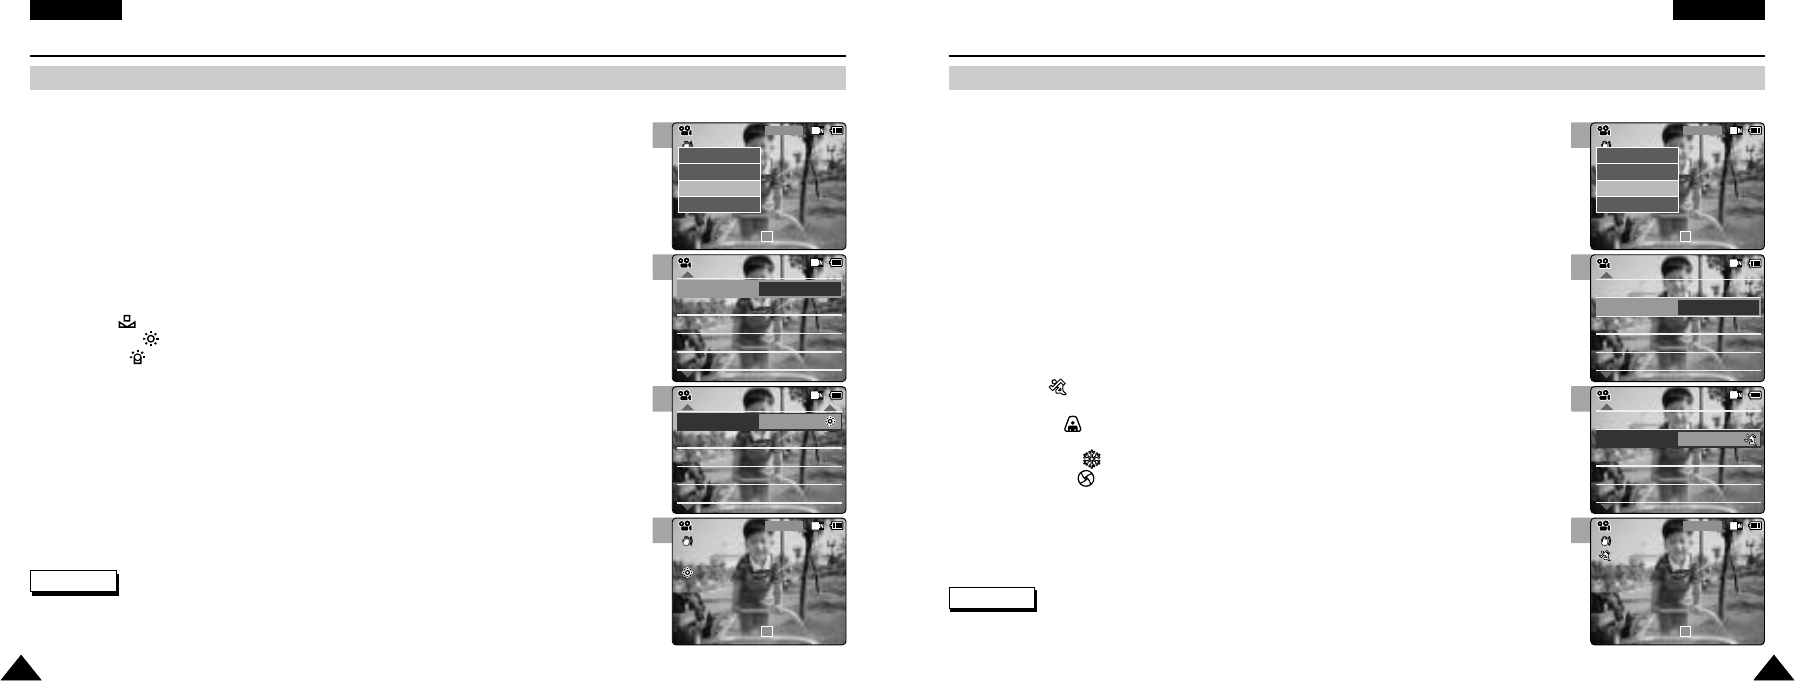
Setting the White Balance
The colour balance may vary depending on the lighting conditions.
The White Balance is used to preserve natural colours under different lighting conditions.
1. Move [Mode Selector] down to turn on the CAM.
◆ The Video Record screen appears.
◆ You can select Video mode or Previous mode as the start-up mode in System Settings.
(Refer to page 94)
2. Press the [Menu] button and move the [ ▲/▼] switch.
Press the [OK] button after selecting <Settings>.
3. Move the [ ▲/▼] switch to select <White Balance> and press the [OK] button.
◆ Auto: Adjust the colour depending on the condition automatically.
◆ Hold( ): Record with first selected colour without adjusting colour.
◆ Outdoor( ): Record with the balanced light. (Natural light)
◆ Indoor( ): Record with the balanced light. (Glow lamp or light in the studio)
4. Move the [ ▲/▼] switch to select desired setting and press the [OK] button.
5. Press the [Menu] button to finish setting.
◆ The icon of selected function is displayed.
◆ If you select <Auto>, any icon is not displayed.
Notes
✤
If you select <Back> in the menu, the previous menu appears.
✤
Turn the Digital Zoom off for more accurate White Balance setting.
✤
Press and hold the [Menu] button in Video Record, you can move to <Settings> directly.
Digital Zoom
Off
BLC
Off
Effect
Off
Program AE
Auto
Digital Zoom
Off
BLC
Off
Video Settings
Effect
Off
Program AE
Auto
White Balance Auto
Video Settings
Digital Zoom
Off
BLC
Off
Effect
Off
Program AE
Auto
Digital Zoom
Off
BLC
Off
Video Settings
Effect
Off
Program AE
Auto
White Balance Outdoor
Video Settings
BLC
Video Record
00:00 / 10:57
SF / 720
STBY
Video Record
SF / 720
00:00 / 10:57
STBY
Play
Record
Settings
Back
2
3
4
5
Setting the Program AE (Programmed Auto Exposure)
It allows you to adjust the aperture setting to suit different conditions.
1. Move [Mode Selector] down to turn on the CAM.
◆ The Video Record screen appears.
◆ You can select Video mode or Previous mode as the start-up mode in System Settings.
(Refer to page 94)
2. Press the [Menu] button and move the [ ▲/▼] switch.
Press the [OK] button after selecting <Settings>.
3. Move the [ ▲/▼] switch to select <Program AE> and press the [OK] button.
◆ Auto: Auto balance between the subject and background to get the best result. The shutter
speed automatically varies from 1/60 to 1/250 per second depending on the scene.
◆ Sports( ): For recording fast-moving people or objects. It is suitable for sports events,
recording outside in the car.
◆ Spotlight( ): Compensates for a subject that appears too bright under strong direct light
such as spotlight. It is suitable for concert and school performance.
◆ Sand/Snow( ): Use when the light is very strong such as on the beach or in the snow.
◆ HS Shutter( ): Allows fast-moving images to be captured one frame at a time.
4. Move the [ ▲/▼] switch to select desired setting and press the [OK] button.
5. Press the [Menu] button to finish setting.
◆ The icon of selected function is displayed.
◆ If you select <Auto>, any icon is not displayed.
Notes
✤
If you select <Back> in the menu, the previous menu appears.
✤
Press and hold the [Menu] button in Video Record, you can move to <Settings> directly.
White Balance Auto
Digital Zoom
Off
BLC
Off
Effect
Off
White Balance Auto
Digital Zoom
Off
BLC
Off
Video SettingsVideo Settings
Effect
Off
Program AE
Auto
Video Settings
White Balance Auto
Digital Zoom
Off
BLC
Off
Effect
Off
White Balance Auto
Digital Zoom
Off
BLC
Off
Video Settings
Effect
Off
Program AE
Sports
Video Settings
BLC
Video Record
00:00 / 10:57
SF / 720
STBY
Video Record
SF / 720
00:00 / 10:57
STBY
Play
Record
Settings
Back
VP-M102 UK_1-Video 2004.12.20 11:35 AM Page 48
