2
3
4
5
ENGLISH
Video Mode : Setting Various Functions
5151
ENGLISH
Video Mode : Setting Various Functions
5050
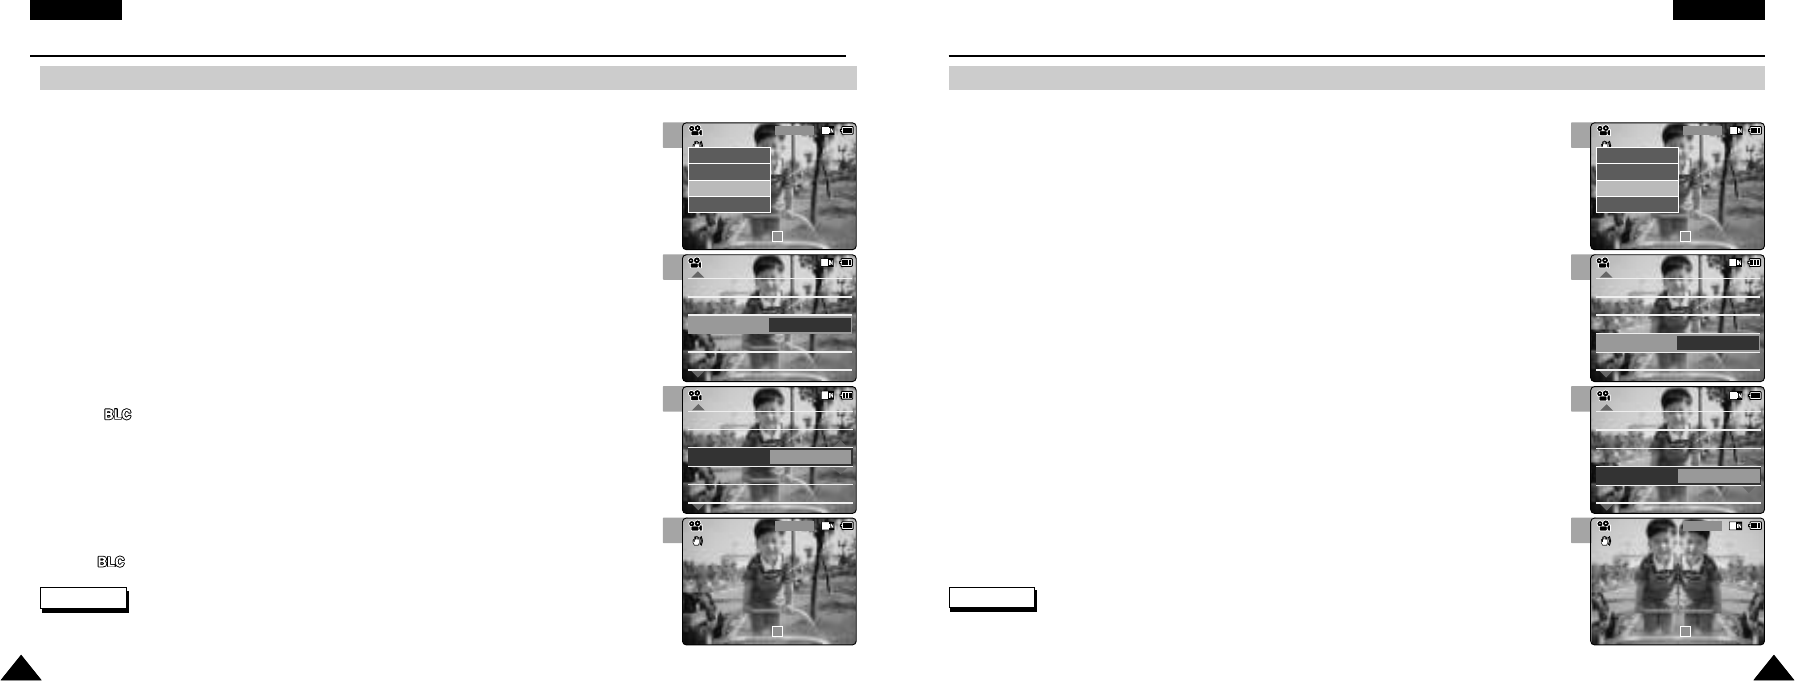
Setting the BLC (Backlight Compensation)
The Backlight Compensation function helps to make the subject brighter when the subject is
in front of a window or the subject is too dark to distinguish. You can use this function when
using your the CAM in the bright background and snowy background.
1. Move [Mode Selector] down to turn on the CAM.
◆ The Video Record screen appears.
◆ You can select Video mode or Previous mode as the start-up mode in System Settings.
(Refer to page 94)
2. Press the [Menu] button and move the [ ▲/▼] switch.
Press the [OK] button after selecting <Settings>.
3. Move the [ ▲/▼] switch to select <BLC> and press the [OK] button.
◆ On( ): Set the BLC function.
◆ Off: Cancel the BLC function.
4. Move the [ ▲/▼] switch to select desired setting and press the [OK] button.
5. Press the [Menu] button to finish setting.
◆ < > is displayed.
Notes
✤
If you select <Back> in the menu, the previous menu appears.
✤
Press and hold the [Menu] button in Video Record, you can move to <Settings> directly.
White Balance Auto
Program AE
Auto
Digital Zoom
Off
Effect
Off
White Balance Auto
Program AE
Auto
Digital Zoom
Off
BLC
Off
Video SettingsVideo Settings
Effect
Off
Video Settings
Effect
White Balance Auto
Program AE
Auto
Off
Digital Zoom
Off
Effect
White Balance Auto
Program AE
Auto
Off
Digital Zoom
Off
BLC
On
Video SettingsVideo Settings
Video Settings
Video Record
00:00 / 10:57
SF / 720
BLC
STBY
Video Record
SF / 720
00:00 / 10:57
STBY
Play
Record
Settings
Back
2
3
4
5
Setting the Effect
You can create professional looking effect on your video file.
1. Move [Mode Selector] down to turn on the CAM.
◆ The Video Record screen appears.
◆ You can select Video mode or Previous mode as the start-up mode in System Settings.
(Refer to page 94)
2. Press the [Menu] button and move the [ ▲/▼] switch.
Press the [OK] button after selecting <Settings>.
4. Move the [ ▲/▼] switch to select desired setting and press the [OK] button.
5. Press the [Menu] button to finish setting.
◆ The letters of selected function is displayed.
3. Move the [ ▲/▼] switch to select <Effect> and press the [OK] button.
◆ Off: Cancel the <Effect>.
◆ Art: Artistic effects on your video file.
◆ Mosaic: Amosaic overlay appears on your video file.
◆ Sepia: The picture is displayed in sepia colour similar to that of an old photograph.
◆ Negative: Reverses the colours, creating the look of a negative.
◆ Mirror: This mode cuts the picture in half using a Mirror effect.
◆ B&W: Changes the images into Black and White.
◆ Emboss: Embossing effects on your video file.
White Balance Auto
Program AE
Auto
Digital Zoom
Off
BLC
Off
White Balance Auto
Program AE
Auto
Digital Zoom
Off
BLC
Off
Video SettingsVideo Settings
Effect
Off
Video Settings
White Balance Auto
Program AE
Auto
Digital Zoom
Off
BLC
Off
White Balance Auto
Program AE
Auto
Digital Zoom
Off
BLC
Off
Video SettingsVideo Settings
Effect
Mirror
Video Settings
BLC
Video Record
00:00 / 10:57
SF / 720
Mirror
STBY
Video Record
SF / 720
00:00 / 10:57
STBY
Play
Record
Settings
Back
Notes
✤
If you select <Back> in the menu, the previous menu appears.
✤
Press and hold the [Menu] button in Video Record, you can move to <Settings> directly.
VP-M102 UK_1-Video 2004.12.20 11:35 AM Page 50
