


47
Recording/Playback
conditions smoothly. If you store manually
adjusted settings of white balance, you can
smoothly shift from one scene to another
under different conditions, such as from
indoor to outdoor.
Sony recommends that you use a tripod to
avoid image blurring.
You can set the items, such as transition
curve and transition time, in [SHOT
TRANSITION] of the (CAMERA
SET) menu (p. 73).
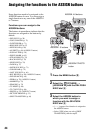
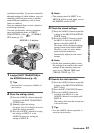
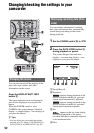
1 Assign [SHOT TRANSITION] to
the ASSIGN buttons (p. 44).
z Tips
• Shot transition is assigned to ASSIGN 4, 5
and 6 buttons.
2 Store the settings (shot).
1 Press the ASSIGN 4 button repeatedly
to bring up the SHOT TRANSITION
STORE screen.
2 Manually adjust the settings.
See pages 26 to 41 for details on how to
adjust the settings manually.
3 Press the ASSIGN 5 button for storing
the settings in SHOT-A, or the
ASSIGN 6 button for storing the
settings in SHOT-B.
b Notes
• The settings stored in SHOT-A or
SHOT-B will be erased when you set
the POWER switch to OFF.
3 Check the stored settings.
1 Press the ASSIGN 4 button repeatedly
to bring up the SHOT TRANSITION
CHECK screen.
2 Press the ASSIGN 5 button to check
the SHOT-A. Press the ASSIGN 6
button to check the SHOT-B.
The image will be displayed with the
settings stored in the selected SHOT.
The focus, zoom, iris, gain, shutter
speed and white balance are
automatically adjusted to the stored
settings.
b Notes
• On the shot transition check screen,
the settings do not shift to the stored
settings of the transition time and
curve set in [TRANS TIME] and
[TRANS CURVE] (p. 73)
4 Execute the shot transition.
1 Press the ASSIGN 4 button repeatedly
to bring up the SHOT TRANSITION
EXEC screen.
2 Press the REC START/STOP button.
3 Press the ASSIGN 5 button for
recording with SHOT-A, or the
ASSIGN 6 button for recording with
SHOT-B.
The settings shift from the current ones
to the stored ones.
z Tips
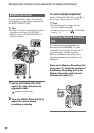
• Press the ASSIGN 4 button repeatedly to
cancel the shot transition.
ASSIGN 4 - 6 buttons
Continued ,