


68
Dubbing only desired scenes – Digital program editing
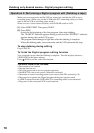
If you connect using the i.LINK cable (DV connecting cable)
With digital-to-digital connection, video and audio signals are transmitted in digital
form for high-quality editing.
When you connect with the i.LINK cable (DV connecting cable)
You may not be able to operate the dubbing function correctly, depending on the VCR.
Keep the i.LINK connection, and follow the procedure from step 2 on page 61.
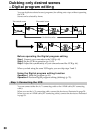
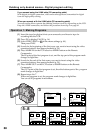
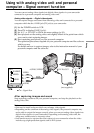
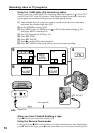
Operation 1: Making Programs
(1) Insert the tape for playback into your camcorder, and insert a tape for
recording into the VCR.
(2) Press FN to display PAGE1 (p. 16).
(3) Select VIDEO EDIT in
in the menu settings (p. 89).
Then press EXEC.
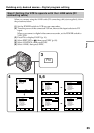
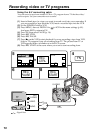
(4) Search for the beginning of the first scene you want to insert using the video
operation buttons, then pause playback (p. 29).
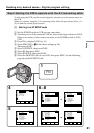
(5) Press MARK IN on the LCD screen or MARK button on the Remote
Commander.
The IN point of the first program is set, and the top part of the program mark
changes to light blue.
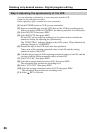
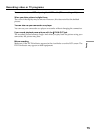
(6) Search for the end of the first scene you want to insert using the video
operation buttons, then pause playback (p. 29).
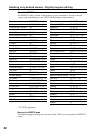
(7) Press MARK OUT on the LCD screen or MARK button on the Remote
Commander.
The OUT point of the first program is set, then the bottom part of the program
mark changes to light blue.
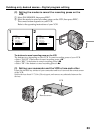
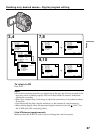
(8) Repeat steps 4 to 7.
When one program is set, the program mark changes to light blue.
You can set 20 programs in maximum.
5~8
3
OTHERS
BEEP
COMMANDER
D
I
SPLAY
V
I
DEO ED
I
T
ED
I
T SET
EXIT
RET.
EXEC
READY
0:32:30:14
TOTAL
SCENE
0:00:00:00
0
V I DEO ED I T
DV I N
MARK
I
N
START
ERASE
ALL
UNDO
END
0:08:55:06
TOTAL
SCENE
0:00:00:00
0
V I DEO ED I T
DV I N
MARK
OUT
START
ERASE
ALL
UNDO
END
0:09:07:06
TOTAL
SCENE
0:00:12:13
1
V I DEO ED I T
DV I N
MARK
I N
START
ERASE
ALL
UNDO
END
0:10:01:23
TOTAL
SCENE
0:00:47:12
3
V I DEO ED I T
DV I N
MARK
I N
START
ERASE
ALL
UNDO
END