


12
Basic operations
Camera recording
Make sure that the power source is installed and a cassette is inserted and that the START/
STOP MODE selector inside the LCD panel is set to . Before you record one-time events,
you had better make a trial recording to make sure that the camcorder is working correctly.
When you use the camcorder for the first time, power on it and reset the date and time to
your time before you start recording (p. 118).
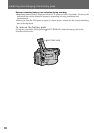
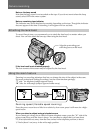
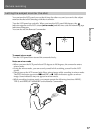
(1) Remove the lens cap by pressing both knobs on its sides and pull the lens cap string
to fix it.
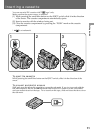
(2) While pressing the small green button on the POWER switch, set it to CAMERA.
The camcorder is set to Standby mode.
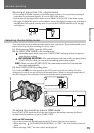
(3) Press START/STOP.
The camcorder starts recording. “REC” appears on the LCD screen or in the
viewfinder. The camera recording lamp on the front of the camcorder also lights
up.
You can also select Recording mode, SP (standard play) mode or LP (long play) mode.
Set REC MODE in the menu system according to the length of your planned recording
before you start.
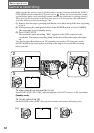
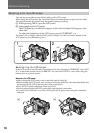
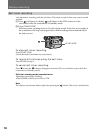
To stop recording momentarily [a]
Press START/STOP. The “STBY” indicator appears on the LCD screen or in the viewfinder
(Standby mode).
To finish recording [b]
Set the POWER switch to OFF. Then, eject the cassette and remove the battery pack.
1
2
3
POWER
OFF
CAMERA
MEMORY
VTR
POWER
OFF
CAMERA
MEMORY
VTR
70
min
REC
60
min
0:00:00
70
min
STBY
–:––:––
POWER
OFF
CAMERA
MEMORY
VTR
[a]
70
min
STBY
25
min
0:35:20
POWER
OFF
CAMERA
MEMORY
VTR
[b]