


83
Advanced operations
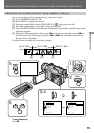
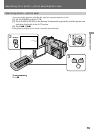
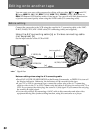
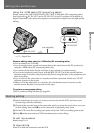
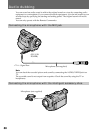
Using the i.LINK cable (DV connecting cable)
Simply connect the VMC-IL4415/IL4435/2DV/4DV i.LINK cable (DV connecting cable)
(not supplied) to DV IN/OUT and to DV IN/OUT of the DV products. With digital-to-
digital connection, video and audio signals are transmitted in digital form for high-quality
editing.
Notes on editing when using the i.LINK cable (DV connecting cable)
•You can connect one VCR only.
•You can record picture, sound and system data at the same time on the DV products by
using the i.LINK cable (DV connecting cable) only.
•You cannot edit the titles, display indicator or the contents of cassette memory.
•If you record playback pause picture with the DV IN/OUT jack, the recorded picture
becomes rough. And when you play back the picture using the other video equipment, the
picture may jitter.
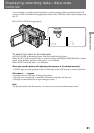
•You can also use the camcorder as a recorder with this connection. In this case “DV IN”
indicator appears on the screen.
•When you use the camcorder as a recorder, the color balance may be incorrect on the
monitor screen. But this is not recorded on the tape.
To perform a more precise editing
Use DV synchro-editing function (see page 84).
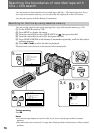
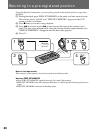
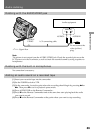
Starting editing
(1)Insert a blank tape (or a tape you want to record over) into the VCR, and insert your
recorded tape into the camcorder.
(2)Play back the recorded tape on the camcorder until you locate the point where you want
to start editing, then press P to set the camcorder in playback pause mode.
(3)On the VCR, locate the recording start point and set the VCR in recording pause mode.
(4) Press P on the camcorder and VCR simultaneously to start editing.
To edit more scenes
Repeat steps 2 to 4.
To stop editing
Press π on both the camcorder and the VCR.
Editing onto another tape
DV IN/OUT
(not supplied)
ç
: Signal flow
S VIDEO LANC
DV
DV IN/OUT