


62
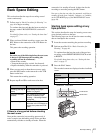
Back Space Editing
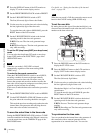
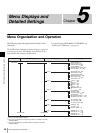
Chapter 4 Recording and Playback
4
Press the STOP button when the tape reaches the
position where you want to start the new recording
(see the figure in step 3).
This stops playback.
5
Press the RET button on the lens.
This rewinds the tape slightly and runs it until the
continue point, then sets the camcorder to recording
pause state.
6
Press the REC button on the camcorder or the VTR
button on the lens.
This starts recording.
To carry out back space editing frame by frame,
specify the continue position using the edit search
function. For details, see the next section
“Using the
edit search function while back space editing”.
• When the scan mode is 24P, the value of the least
significant digit is limited to 4 or 9 (DSR-450WS only).
• If you set the POWER switch to off during recording or
when recording is paused, the camcorder automatically
goes through its shut-down sequence, then powers off.
When you next set the POWER switch to on, the
camcorder automatically finds the point at which
recording ended, and sets itself up so that you can carry
in with continuous recording. Note that this operation
takes several seconds: do not set the POWER switch to
off or replace the battery during this interval, as the
automatic recording continuity will be lost.
Note also that the recording continuity is lost in the
following cases.
- If the POWER switch is set to on and off repeatedly.
- If the camcorder is left powered off for several hours.
- If the camcorder is subject to severe vibration while
powered off.
- If for any other reason the automatic recording
continuity function is unable to operate correctly.
- If the lithium battery (CR2032) is exhausted, or if no
lithium battery has been fitted.
- If the recording format is changed.
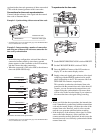
Using the edit search function while
back space editing
You can use the edit search function to find the desired
tape location when continuing to record from any other
location on the tape. Press and hold one of the EDIT
SEARCH +FWD/–REV buttons to activate the search
playback function for as long as you hold down it.
1
Insert the cassette containing the previous recording.
2
Perform steps 2 to 11 in “Basic Procedure for
Shooting” on page 46.
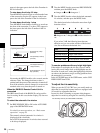
3
Press and hold either of the +FWD or –REV button of
the EDIT SEARCH +FWD/–REV buttons.
The tape is moved in reverse or forward search mode
for as long as you hold down the button, and the image
is shown in the viewfinder.
Do not shut off the power while using the edit search
function. The continue point may be lost.
4
Release the +FWD or –REV button when you find the
tape location where you want to continue shooting.
Recording is paused.
5
Press the REC button on the camcorder to the VTR
button on the lens.
Recording starts.
Notes
Note
EDIT
STOP
REV
REW PLAY F FWD
FWD
SEARCH
–REV button +FWD button